Bits, Saddle Fitting and Hoof Balance
With
Instructor Eleanor Blazer
Lesson
Two
Saddle Fitting
Girth a horse
tightly so the saddle doesn’t slip.
Wrong!
Position the saddle
correctly so the saddle doesn’t slip.
Right!
Girth the horse
“snugly”, but never tightly.
Tight
girths are just one of the “don’t dos” of tacking up. Horses that are girthed tightly soon become
“cinchy” and dislike being saddled. Once
they resent being saddled, they’ll often reach around and try to bite the
saddler…or they’ll expand their girth area so the girth will be “snug,” but
comfortable when they relax.
That
“snug” girth is nearly always “just about right.” After all, riding is easy….just
keep a leg on each side…and you don’t need a tight girth to do that.
But
before you girth that saddle, let’s study saddles, and then saddle fitting.
Most
of the world calls the “riding” saddle a flat saddle. In the
The
flat or English saddle is split into two basic styles…the Saddle Seat and the
Hunt Seat.
Saddle
Seat riders use a saddle with a relatively flat seat that places the rider well
behind the withers and just behind the horse’s natural balance point
(center.) Saddle Seat riders are
expecting to ride down the road or in the show ring; they are not expecting to
“jump.”
While
any breed can be ridden with the Saddle Seat saddle, the most common breeds are
American Saddlebreds, Morgans, Tennessee Walking Horses, Arabians and most
gaited horses.
Because
the head of the saddle is often cut back to accommodate high withered horses,
the saddles are sometimes called, “cutbacks.”
The
Hunt Seat saddle, often called a Forward Seat saddle, are
very popular now in the
Sub-categories
include: All-Purpose, Close Contact and Dressage.
The
All-Purpose saddle is the most popular due to its general versatility. It has a deeper seat and a padded knee roll
to provide more security and can be ridden in such disciplines as pleasure,
trail riding, horsemanship and even eventing. It is an excellent choice for the new or
novice rider.
The
Close Contact saddle is used for jumping rather than flat work. It is designed with a very flat seat allowing
the rider to maintain a very sharp hip angle facilitating the rider taking the
“two-point” jumping position.
The
Dressage Saddle is used specifically for dressage, giving the rider balance
through the seat while allowing maximum side contact with the horse. The dressage rider wants a straight hip
angle, allowing a “deep” seat. The
straight, longer flap on the dressage saddle promotes a longer stirrup. A knee roll is optional.
The dressage rider’s saddle allows for maximum leg contact.

LEARN THE PARTS OF THE FLAT SADDLE
Most English or flat saddle are
made in
The
fittings for a flat saddle—stirrup leathers, stirrup irons and girth--are not
generally included with the saddle, and are selected to meet the needs of the
individual rider.
The
western saddle, originating long before the wild west of the
The
general purpose western saddle is used for everything. But more and more the western rider is
seeking a specialized form, such as the cutting saddle, the roping saddle and
the “games” saddle used for barrel racing and pole bending.
The
cutting saddle has a “wrap around” fork configuration to help hold the rider in
place as the horse moves laterally with almost unbelievable speed.
The
roping saddle has the stirrups set in such a way as to keep them from moving
rearward. This allows the roper to stand
in the stirrups and lean forward without his or her feet swinging toward the
horse’s hindquarters.
The
game saddle is cut small to avoid any kind of interference with the horse’s
movement and to reduce the saddle’s overall weight.
The most
specialized western saddles are the Parade saddle and the show saddle, both
usually sporting silver in an array of patterns. While Parade saddles are big so they can
carry lots of silver, the western show saddle has plenty of silver and a
variety of “seats” to give the rider a “show look.”
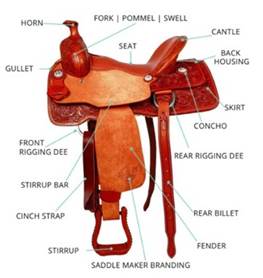
LEARN THE PARTS OF THE WESTERN SADDLE
Saddle Blankets and Pads
Saddle
blankets and pads are designed to 1. protect the horse’s back, 2. absorb sweat
and moisture, 3. protect the saddle and 4. help saddles fit better.
NAVAJO
BLANKETS are colorful outer blankets used with the western saddle. They are made of wool and can be quite
expensive. They need to be dry cleaned,
but if cared for, will last a lifetime.
SHEEPSKIN
PADS are sort of the English equivalent of the Navajo blanket. Sheepskin pads are expensive, but if brush
clean after each use and occasionally washed in cool water, they too will last
a lifetime.
BLENDED
FIBER blankets look like Navajos, but are not as durable since then are usually
made of cotton or some synthetic.
IMITATION
SHEEPSKIN is just what it says it is.
Popular because they are less expensive, they don’t hold their shape as
well as the real thing and they are not as absorbent. They are less expensive and are usually
machine washable.
HAIR
PADS are great at absorbing sweat and they
are good shock absorbers. The drawbacks
include being hard to clean and slow drying.
Protective leather pieces (wear patches) under the stirrup leathers on
the western saddle protect the pad, giving it a longer life.
FELT
PADS are available for both western and English saddles, but are hard to keep
clean and cannot be washed.
FOAM
PADS are available for both western and English saddles and are great shock
absorbers. They come in a range of
colors and quality. They have one big
drawback…foam doesn’t breathe, so they create a good deal of sweat and can
setup a situation where the horse’s back is irritated.
THERAPEUTIC
PADS are available in for both western and English saddles. Riders choose them for horses that become
back-sore easily or as an insurance policy when a horse is under extra stress. Before going to a therapeutic pad, check to
make sure the saddle fits correctly.
To know about
saddle fitting, we start with the horse’s back.
Most
veterinarians, horse trainers and riding instructors agree between 25 and 50
per cent of all horses have some degree of soreness in their back. You don’t actually hear them complaining
because horses are pretty stoic when it comes to pain, and the manifestation of
the sore back comes in the form of sour expression, poor movement, loss of
condition and resistance to work. (To
make a preliminary test, just run your finger tips
down your horse’s back on both sides of his spine. If the horse flinches or “sinks” he probably
has some sore spots.)
The
horse’s back is much like a human’s. The
back is composed of a chain of bones, through the middle of which runs the
spinal cord and around the outside of which are affixed large, strong muscles
and the ribs. The horse’s spine was
designed to have weight suspended from it, but not to support weight on one
small part atop it.
When you are sitting on a horse, the horse’s spine is
under strain it was not designed to withstand.
Imagine the strain on the horse’s back when we gallop him, bounce on
him, or jump him.
To
make matters worse for the horse, the horse’s spine has very little direct or
lateral flexion. In fact, the spine
normally only bends in fractions of a millimeter. All this talk of “lateral spinal flexion” is
just that—so much talk; lateral flexion of the horse’s spine is virtually
imperceptible. What lateral flexion he
does achieve, he does by softening his body.
Any
injury or stress to the spinal bones can produce inflammation which essentially
is the mildest form of back soreness. Of
course there can also be damage to the muscles, to the spinal cord itself or to
the ribs.
The
two main causes of “ordinary” sore backs are pressure and friction.
Both
are generally caused by poor fitting saddles, saddle pads and saddle blankets. (After poor fitting tack, the second greatest
cause of sore backs is poor riding skill.)
According
to a study by New Mexico State University National Agri-Marketing Club a very
large percentage of riders do not have properly fitting saddles.
The study considered two types of
riders, ropers and barrel racers. The
roping saddle sample showed 41.3 per of the saddles had unacceptable saddle bar
pressure and nearly 27 per cent showed spinal pressure at harmful levels.
Fit problems were far more likely to
occur at the front of the saddle with 93 per cent showing elevated pressure
points at the pommel.
Bridging was an issue with almost 85
per cent of the roping saddles.
The barrel saddle sample showed
excessive pressure in the front of the saddle in 49 per cent of the cases with
16 per cent showing spinal pressure.
More than 90 per cent of the barrel saddle showed “bridging.”
The study is a myth buster if you
think saddle pads can correct poor saddle fit.
It is incorrect to think a thicker pad will be more comfortable for your
horse. The study revealed that every inch of pad thickness increased the chance
of poor fit by more than 23 per cent because the “pad paradox” increased the
incidence of bridging.
The first time a saddle is placed
on a horse, that saddle should be tested for fit. If the saddle doesn’t fit properly……don’t use
it! And claiming it is the only saddle
available is not acceptable. Anyone who
can’t beg, borrow or purchase a saddle that fits his or her horse should not be
riding.
CORRECT SADDLE PLACEMENT
(ENGLISH OR
WESTERN)
Have
the horse standing on level ground.
Ideally,
we want the saddle placed so it rests solidly and level on the horse’s
back. In this position, the rider’s
center of balance will be just behind the horse’s natural balance point at a
standstill. As the horse begins to move,
engaging the hindquarters, his natural balance point (just behind and slightly
above his elbow) will move back and under the rider as the horse begins to
round his back upward. Now the horse,
saddle and rider are in balance.
Place
the saddle pad or blanket over the withers and well forward. Now place the saddle in position, over the
withers and forward.
Slide the saddle and pad backward until they settle into a
natural position, behind the withers and level on the back.
For many, this
saddle position is going to seem too far back.
It is not!
The
gullet of the saddle will be somewhat over the withers, the saddle will be
level (gullet and cantle level) and the back of the saddle will not be pressing
into the loin area. The girth will not
be immediately behind the elbow, but will be several inches behind the elbow.

Check the pad or saddle blanket.
At least two fingers should slide easily between
the withers and the saddle.

Saddle is sitting level on
horse’s back - off the withers, but not into the loin.
Girth is behind elbow. The saddle is in its natural place and not
restricting shoulder movement.
If
the saddle is left too far forward, well over the withers, and the girth is
directly behind the elbow, the movement of the horse’s shoulders will be
restricted. Both stride and lateral
action are adversely affected.
Properly
position, the saddle will not need to be “tightly” girthed. It stays in position naturally and only needs
a “snug” girth to remain there.
Now
in position, the rider should check the pad or saddle blanket and lift it up
into the gullet so that at least two fingers slide easily between the withers
and the saddle.
Problems
arise when the saddle is left propped forward on the horse’s withers, or when
the saddle is pushed too far back and rests on the loin. (Western saddles with large skirts—mucho room
for silver---are usually the saddles that create soreness in the loin area.)
Horses
with wide flat (mutton) withers can suffer discomfort and pain if the saddle
creeps forward toward the neck.
Rubberized or “non-slip” grip pads can help avoid this problem.
When
a saddle is built with a downward slope fore to aft (Saddle Seat, Western
Equitation Seat), the rider is seated behind the horse’s center of balance,
causing unwanted pressure on the horse’s back near the loin.
You
can spot problems from the ground if you just stand back and observe the tacked
horse.
Are
the forks of a western saddle or the pommel of an English saddle sitting higher
than the cantle? Is the saddle too far
forward crowding the shoulders? Do the
bars of the saddle rest on the loins? Do
the stirrups hang off the vertical?
If
the answer to any of those questions is “yes,” evaluate the design of the
saddle; reposition the saddle and then decide if it is the saddle or just the
way the horse was tacked.
The
tongue on a western girth should not be left unused. The protruding piece of steel could cause
injury if the horse should fall or brush against something solid. If you've got it, use it. If you prefer to tie the latigo, use a girth
with "tongue less" hardware.


Secure the tongue
Do not let the tongue protrude
A
The
bars of a western saddle are usually called Quarter Horse bars or Arabian
bars—essentially, they are the same thing.
A
semi-QH bar is for a narrow to average sized horse with relatively high
withers.
QH
bars are for an average size to wider horse with an average withers for his
size and shape.
Full
QH bars are for a wide horse to a small draft type with a flat withers.
You
should be able to put 3 to 4 fingers together and place them vertically between
the withers and the pommel of the new saddle.
Once a saddle is broken-in, the distance will shrink to
Looking
at the saddle from the back—yes, you need to stand directly behind the horse,
so be careful—there should be no obvious gaps along the back of the saddle.
There
should be space between the end of the saddle skirt and the horse’s hips so the
hip and loin are not rubbed.
You
will need to ride a saddle to make a final determination as to its proper fit.
Ride
the western saddle for 5 minutes and then get off and check the fit again. Has the saddle shifted? Is it rubbing the horse anywhere? Are the withers free from pressure?
Remount
and walk, jog and lope for 15 minutes or more to be sure the horse is creating
a sweat under the saddle pad or blanket.
While riding, you should be looking for unusual behavior…such as laying
back of the ears, bucking, or turning to bite at your leg—all signs the saddle
might not be too comfortable.
When
you are sure the horse has had enough work to break a sweat under the saddle
pad and blanket, return to the barn and pull the saddle. What to you see?
If
the horse’s back has a nice even wet spot showing that the saddle and pad sat
evenly on the horse’s back, you can be pretty sure the saddle is a good fit.
If
there are dry spots, you can be pretty sure the saddle does not rest evenly
along the horse’s back. You might need a
different tree width, or the saddle might not be well constructed, or you may
have had the saddle too far forward or too far back. You’ll have to make some decisions at this
point; retest or find a new saddle.
Saddles,
inexpensive or high priced may have defects such as panel and flaps
asymmetrical, or twisted trees. Be sure
to check the saddle from side to side; some minor differences can be tolerated,
but those can be seen with the naked eye will usually cause pressure point
problems.
Everything
seems to be going high-tech, including saddle fit. There are supposedly computerized saddle pads
with pressure sensors that are placed under the saddle, and then connected to a
computer. The horse is lunged and the
sensors show high or low pressure points on the computer screen.
While
technology is often useful, it is also often complicated, confusing and
useless. What technology is “reporting”
during a single test today, may be far from the truth tomorrow. There are ever-changing variables—the horse,
the saddle and the rider.
Informative western saddle link (with
advertising):
http://www.western-saddle-guide.com:80/
A
Place
the saddle slightly forward on the horse’s withers, and then press down on the
pummel and slide the saddle reward until it stops at the place dictated by the
horse’s conformation. Repeat this
placement several times until you are sure the saddle is stopping in the same
place each time. This spot should be 2
to 3 inches behind the shoulder blade.
Lift
the flap of the saddle and find the angle of the points, located just under the
stirrup bars—one on each side. If the
angle of the points is too narrow, the points will dig into the horse’s muscle. If they are too wide, the saddle will sit
down in front putting pressure on the withers. Some points are virtually
hidden. If that is the case, you’ll have
to rely on the panel pressure procedure to make a determination.
To
perform the panel pressure procedure, place a hand on the center of the saddle
seat and press the saddle down on the horse’s back. Hold the saddle in place with one hand while
you run the other hand, palm up, under the panels all the way to the back of
the saddle to feel for any uneven contact with the horse’s back. Lift the flaps and examine to fit to ensure
the panels are snug and even on both sides of the withers, that there is no
pressure on the withers and that there is no “bridging,” space where the saddle
does not make good contact with the back.
In
a saddle with a deep or moderate seat, the cantle should be 2 to 3 inches
higher than the pommel. In shallow
seats, such as close contact saddles, the cantle may be only 1 to 2 inches
higher than the pommel.
If
the cantle is level with or below the pommel, the saddle does not fit properly.
The
area of the deepest part of the saddle seat should be level, placing the rider
squarely on the seat bones and in balance.
The
clearance between the pommel and the withers should be approximately 2 to 3
fingers. If the pommel is higher than
that, then the saddle tree is probably too narrow. If the pommel is less than 2 fingers above
the withers, then the tree is probably too wide. If the panels are stuffed with wool, make
allowance for the saddle to settle about a half inch.
Check
the channel clearance. There should be
adequate clearance over the spine and connective tissue throughout the channel.
The
saddle should not shift excessively side to side or up and down. Some shifting may be due to the muscle
conformation of the horse.
A
saddle should never extend beyond the vertebrae corresponding to the last rib,
as that area is weakest area of the back.
Finally,
monitor the horse’s response to all that you are doing. Watch for body language telling you the
saddle may not be as comfortable as you had hoped. And as with the western saddle, ride the
horse and watch him carefully during movement.
Does he feel or appear free, or do you feel and or see resistance? Observation of the horse in movement may be
the most important element of saddle fitting.
Once
the saddle fits the horse, does the rider fit the saddle?
The
most common fault is having a seat too small for the rider, forcing him or her
to sit at the back of the saddle. In an
English saddle the rider’s knee should be at the center of the position of a
knee roll when the back of the rider’s heel would be on a vertical line dropped
from the center of the rider’s shoulder.
English
saddle sizes range from 16 to 18 inches for adults and from 12 to 16 inches for
children. An English saddle is measured
from the saddle nail (a rivet on the front side of the skirt near the pommel)
to the mid-point of the cantle.
Sit
in the saddle several times before you decide if you fit it and it fits you.
Western
saddles generally have seats measuring 13 to 17 inches. Measure from the fork just below the saddle
horn to the highest upward curve of the cantle.
As a general rule there should be a tiny space between your lower
back/buttocks and the cantle. Don’t be
wedged into the saddle, and don’t have any overhang.
Even
when saddles fit correctly, horse’s get sore backs. One of the causes is putting too much weight
on too young a horse. Riding a young
horse for short periods of time and with discretion helps to strengthen the
horse’s muscular and skeletal systems.
Indiscriminate
and excessive work forced on a horse by large riders quickly results in
physical damage.
Spine
supplying exercises, such as light lunge line work, can help alleviate some
back soreness.
If, during your review of the saddle positioning, you notice your horse
is smiling and appears “ready to go,” he is….so snug that girth and enjoy the
ride.
Assignment:
1.
Make a video of you going over the parts of a saddle, which you have memorized.
Do not use a diagram or other form of assistance when making the video. You can use an English or western saddle.
2.
Tell me about the saddle. Is this the
saddle you normally use? For what
discipline do you use it? What size is the seat?
3. Send me pictures of your horse saddled, with
the girth/cinch fastened. Include one
from each side.
Please
send the video, pictures and report to Ms. Eleanor at:
elblazer@horsecoursesonline.com