Equine Massage
LESSON SEVEN
PART THREE
P. HEAD, JAW, POLL
1.
Peter Goody—diagram 8 (page 33)
2.
A Coloring Atlas—plates 43 and 47
The head, jaw and poll are usually the
last areas I work on in a massage. I also
include the upper neck muscles in this section because they have attachments in
the poll area.
Stiffness in this area can cause stiffness
throughout the horse’s entire body and negate the major benefits of a massage.
If an owner indicates that the horse has
head problems such as head tossing, stiffening in the mouth and poll, refusing
to accept contact, twisting its head, grinding its teeth or any other
head/mouth problems, you will want to get as complete a history as you
can—there may be clues to the problem in this information.
The problems in this area can come from
numerous sources. Dental problems are
one of the first you should consider.
Others could be fear of rough handling around the head, chiropractic
problems from injuries, falls or pulling back when tied, ear twitching, and
riders with rough or unsteady hands.
Young horses could be teething.
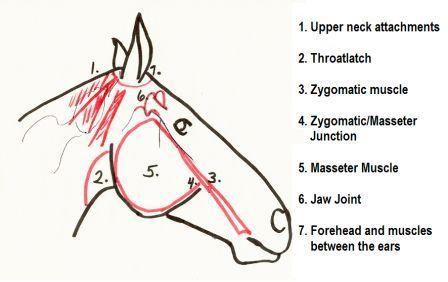
The areas of
the head that will be covered in this section are:
1.
Upper Neck Attachments
2.
Throatlatch*
3.
Zygomatic Muscle
4. Zygomatic/Masseter
Junction*
5.
Masseter Muscle
6.
Jaw Joint*
7.
Forehead and Muscles between the Ears
*Before working in these areas, you will
first do the described techniques on your own throat and jaw. These are sensitive areas to work on and I
want you to feel what the horse will be feeling.
Before getting into specifics of these
areas, I am going to make a statement that I want you to think about because it
should have a bearing on how you approach a common problem in the head. I’m speaking of “poll flexion”. Flexing at the poll is not really flexion of
the poll—it’s throat flexion and poll extension.
What we call poll flexion is really the
muscles in the throatlatch contracting and the muscles that cross the poll
extending. Good “poll flexion” involves
the contraction (flexion) of the muscles in the throat. If these throat muscles are tight in
extension (the horse’s nose “poked out”), it is very difficult for a horse to
yield at its poll. If a rider demands
that the horse do so, the only place the horse can yield is in the joint
between the 2nd and 3rd vertebrae (what you will hear
referred to as “over-flexed at the 3rd vertebrae”). This it can do even if the throatlatch
muscles cannot contract.
One of the things you will learn in this
section is how to balance the tension between flexors and extensors in the head
in order that the horse can give “poll flexion”. This balance is as important as the
relationship between the extensor long back muscles and the flexor
abdominals. In both cases, the
lengthening of the extensors is very important, but will not happen without the
contraction of the flexors.
UPPER
NECK ATTACHMENTS
1.
Splenius
2.
Brachiocephalicus
3.
Rhomboid
4.
Atlas
5.
Base of the ear
6.
Depressor of the ear (groove between jaw and Atlas)
The work you do on the upper attachments
of the Splenius, Brachiocephalicus and Rhomboid will
release tension so that these muscles can both contract and extend at their upper
attachments. Sometimes these muscles
will be over-extended at this point and will have lost their capacity for
contraction. This can happen if a horse
is forced to “flex” in the poll; perhaps by hard, unyielding hands, or the poor
use of devices such as draw reins.
These muscles can also be tight and
contracted. In this case the poll is
held rigid with the horse’s nose poked out.
If the horse has a history of problems
with bridling or having its ears touched, there could be a problem with the
joint between the poll and the Atlas (C-1) or a problem in the jaw joint.
Techniques
1. You will work on the surface of the
Atlas (C-1) from its lower edge upward to the poll. If the area is not sore, you can use vigorous
strokes of broad back and forth friction with your fingers or a rubber
curry. Horses usually enjoy this work
unless the area is sore. If the area is
sensitive or sore, use your fingertips and do the Compress and Release
technique, adjusting your pressure for what the horse can handle.
2. If this area is extremely sore and the
horse gets defensive (throwing its head, backing up, etc.), there could be a
misalignment of the joint between the skull (occipital bone) and the Atlas
(C-1). If the sensitivity continues and
there is no release of tension when you have finished your work on the head,
this is a good indication that a chiropractic adjustment may be necessary.
3. Assuming that the horse is not showing
signs of severe discomfort, continue with the following technique. Massage the area between the crest line and
the Axis (the second neck vertebrae—C-2).
This will release tightness where the Splenius attaches to the
Axis. You can use fingertips or curry
comb, depending on the horse’s level of sensitivity. Do both sides of the neck before going on to
#4.
4. Now, stand facing the horse’s
neck. With finger tips, heel of your
hand, or curry comb put pressure on the Atlas, pushing it away from you, as you
bring the horse’s nose around toward you.
This will release tension where the Splenius attaches to the skull. This is a modified version of Positional
Release.
5. With your fingertips, work around the
base of the ear. (Plate 43 of A Coloring
Atlas has a good diagram of these muscles.)
Next, go down the space between the jaw and the Atlas. The muscle in this groove is the depressor of
the ear (Parotidoauricular). You will use mostly static pressure with
thumbs or fingers down this groove; bringing the horse’s nose around toward you
makes working in this area easier.
6. Using finger tip compression and
friction, work on the muscles on the inside edge of both the jaw and the Atlas.
THROATLATCH
The superficial muscles in the throat may need massage.
1.
Sternohyoid
2.
Omohyoid
3.
Mylohyoid
Plate 47 in A Coloring Atlas shows these very well.
These throat
muscles are the flexors that work with the extensors of the poll—the agonist to
the antagonist of the poll.
Place
your hand in the horse’s throat at the point where the head and neck come together. You will feel a “lump”—this is the hyoid bone
plus a covering of lymph tissue. (A
Coloring Atlas calls this bone the Basihyoid
bone.) The three muscles listed above
attach to this bone.
Tightness in
the muscle attachments here interferes with the mobility of the poll. If these muscles are tight, they hold the
hyoid bone in a tight, stiff position that feels like a tennis ball stuck in
the throat, causing the horse to keep its nose poked out.
Uneven tension
in the mylohyoid muscle, where it attaches to the
sides of the hyoid bone, can pull this “tennis ball” off to one side and
interfere with lateral movements of the head.
You will probably be able to feel this uneven pull in your own throat
when I describe working in this area on yourself, and you’ll quickly learn to
feel it in a horse’s throat.
Horses that
“crib” develop heavy muscles around the hyoid bone that will make poll
“flexion” difficult. Massage can loosen
these constricted muscles and allow a horse to give poll flexion on a temporary
basis, but will not cure a horse of cribbing; the cribbing will keep these
muscles tight and over-developed.
What you can do
for the owners of horses that crib is explain what is happening in these throat
muscles and show them a few massage techniques that will give improved head
carriage and bit response during a ride.
DO THIS ON
YOURSELF FIRST. The throat is a
sensitive area. Before I describe
techniques for loosening and balancing the throat muscles in a horse, I want
you to experience this work on yourself.
I want you to know what this feels like before you do it to a horse.
Find this place
in your own throat and, with your thumb and fingers, move the hyoid bone back
and forth, going side to side. If you have
no restrictions in this area, the hyoid bone will slide easily from side to
side. But you may find that it seems
stuck and doesn’t move. Using your
fingers, work around the mass, gently pushing and rocking it.
If it feels off
to one side, work on the muscles that go from the hyoid bone to the edge of the
jaw. Use fingertip pressure.
It
may take you a while to get comfortable working this area; with practice you’ll
soon find it easy.
Techniques For
Working On The Horse’s Throatlatch
1.
The technique described above for working on your own throat forms the basics
of the techniques for releasing tightness in the horse’s throat.
2.
You will stabilize the horse’s head with one hand on the halter. With your other hand, hold the hyoid bone
between thumb and fingers and push from side to side.
3.
Sometimes, if the hyoid bone is very stiff, you may have to use direct finger
pressure against the side of the bone.
4.
Often, a horse will cough before the tightness releases. This is caused by the hyoid bone being pushed
against the windpipe. It is not
something to be concerned about; the horse won’t do this once the tension
releases around the hyoid bone.
5.
Next, using your fingers, work on the muscles that go from the hyoid bone over
to the inside edge of the jaw. Do this
on both sides.
6.
Lastly, use muscle combing with your fingertips from the hyoid bone down toward
the mouth. You will be working on the Mylohyoid muscle.
Try to draw the horse’s nose out with your fingertips. This will extend the throatlatch and contract
the muscles over the poll. With the nose
poked out, use finger tip compression and friction on the poll. This helps separate the muscle fibers over
the poll. This is a form of the
technique I called “contract to extend” in lesson 6. Remember, it is easier to release contracted
muscles than extended ones.
ZYGOMATIC
Zygomatic (tooth line) muscle
This
is a long, thin muscle that goes from the corner of the horse’s mouth up the side
of the face (following the tooth line) and merges into the cheekbone (facial
crest).
Massage
on this muscle, especially at its junction with the Masseter
muscle, is the first step in preparation for releasing tension and stiffness in
the jaw joint. Pressure here will cause
the horse to open its mouth; any time the horse opens its mouth, the jaw joint
will move. A horse may even yawn from
this first step.
MASSETER/AYGOMATIC
JUNCTION
These two
muscles work in opposite directions, and this forms a major trigger point where
the zygomatic muscle crosses the edge of the Masseter muscle. The
zygomatic works in a direction from the mouth to the
poll and lifts the corners of the horse’s mouth. The Masseter works
to open and close the jaw by moving up and down. This working in opposite directions is what
sets up the trigger point. Pressure here
will produce a big release in the jaw joint.
DO THIS ON
YOURSELF. With your fingers, find the
bottom edge of your cheekbone (zygomatic arch). By opening and closing your mouth, you will
feel the edge of a muscle going from the cheekbone down to your jaw.
Just in from of
this muscle (the Masseter), and between the cheekbone
and your top teeth, you will find a sensitive spot. Put pressure on this point. Most people will find this very uncomfortable
and will try to move their jaw to get away from the pressure. A horse will do the same thing at first, but
will quickly learn how to release the pressure by opening its mouth and moving
its jaw joint.
At some point
in this work, most horses, in addition to opening their mouths and moving the
jaw joint, will start to yawn so that the joint opens completely.
Techniques For
Working On The Horse’s Zygomatic/Masseter
Junction
1.
Stand in front of the horse (or in a position in which you are
comfortable). Stabilize on side of the
horse’s head with one hand on the halter.
With your other hand apply thumb or finger pressure to the Zygomatic muscle, pressing the muscle against the jaw. Start near the mouth and work up the muscle
to its junction with the Masseter.
2.
Once the horse opens its mouth to this pressure, you will apply pressure to the
junction between the Masseter and the Zygomatic muscles.
3.
You can also hold the horse’s head between both of your hands and work on both
sides of the face at the same time. You
will probably find that one side will be tighter than the other.
4.
Next, with your fingers, use pressure and friction along the edge of the cheek
(facial crest). This will be working on
the upper portion of the Zygomatic and the attachment
of the Masseter muscle to the cheekbone.
5.
Use friction and muscle combing with your fingers over the surface of the Masseter. Work under
the edge of the jaw.
6.
Finally, use finger pressure and friction under the jaw joint. Plate 41 of A Coloring Atlas has a good
picture of this joint.
JAW
JOINT
When I talk
about the jaw joint, I am primarily interested in the Coronoid
process. Plate 41 in A Coloring Atlas
shows this very clearly. You will see a
small piece of bone that sticks up above the zygomatic
arch (cheek bone). This is actually part
of the lower jaw, and is the pivot point for the lower jaw. There are muscles in the forehead and under
the ears that attach to this piece of bone and control its movement. Plate 43 of A Coloring Atlas shows some of
these muscles.
If these
muscles are tight, they will restrict the movement of the jaw (Mandible) in the
same way that tight Rhomboids that attach the shoulder blade to the withers
will restrict the swing of the shoulder blade.
DO THIS ON
YOURSELF. Locate your jaw joint. It will be at the base of your ear and just
in front of the ear. With your
fingertips, explore how this joint feels and how it works as you open and close
your mouth; also move your jaw from side to side and around in a circle. Notice any restrictions in the movement of
the joint. See if you can find a spot
just on top of the joint that, when pressed, will cause you to feel as if the
joint “drops away” from your pressure and your mouth opens and you’ll probably
yawn.
Techniques
1. Apply direct finger pressure
above the jaw joint, pressing downward against the joint. This pressure will be working on muscle
attachments to the small section of the jaw that protrudes above the cheekbone
(Coronoid process).
As these muscles release their tightness and lengthen, you’ll feel the
joint “drop down” away from your pressure as the horse opens its mouth and
yawns.
2. If the jaw feels very tight
and is not releasing, I will often go back to the tension point at the Zygomatic/Masseter junction and apply pressure. As the horse opens its mouth to this pressure
I will apply pressure at the same time to the area above the jaw joint. In that way, I can usually get a full release
of the joint.
3. If you are
not able to get any movement in this joint, or if the horse shows real
distress—STOP. Ask again about
the horse’s dental care and do not continue if there has not been a recent
dental exam that included a thorough examination of the far back molars. Even if the horse has had consistent dental
care, if it is approaching a year since the last dental exam, it is possible
that hooks have developed on the back molars and these are restricting jaw
movement; actually locking the jaw up.
Ask the owner to have the horse’s mouth looked at before you do any more
work on the jaw joint.
FOREHEAD
You have worked
on the muscles behind the ears—the ones that attach the skull to the Atlas—as a
first step in working on the horse’s head.
You will finish this work on the head by massaging the muscles of the
forehead and between the ears. Plate 43
of A Coloring Atlas has a good drawing of these muscles. Diagram 13 (page 45) in Peter Goody’s book
shows these muscles from a front view.
Techniques
Use fingertip
effleurage and muscle combing over this area.
Your intention is to separate the muscle fibers and activate endorphin
points. Your pressure can be more
soothing and gentle.
Q. OTHER AREAS OF THE BODY
1.
Ribs
2.
Upper portions of the legs
3.
Tail
I have grouped
these three areas together because, even though they can sometimes be the source
of problems, they don’t form the bulk of my massage work.
1.
Ribs. The rib cage is a static
structure; any movement that it makes is done as a unit. There is no individual movement of the parts
of the rib cage other than a very slight contraction of the thin muscles that
attach the ribs to each other (the intercostals). Very thin muscles cover the sides of the rib
cage, including the External oblique, whose important area of contraction and
extension is along the bottom edge. I
described this in the section on massaging the abdominal area. The basic technique for loosening this
muscle is circular or back-and-forth friction using some type of tool—perhaps a
rubber curry. This is basically what you
would do in a grooming. The intercostals
can be loosened by working up the space between the ribs with your fingers or
your elbow.
2. Upper portions of the
legs. I have mentioned that some massage
can benefit lower leg problems, but this massage is not done on the lower legs;
it is done on the muscles in the upper portions of the legs. The lower legs do not have muscles, only
tendons and ligaments. But almost all of
the tendons below the knee and hock are extensions of muscles above those
joints. If there is any constriction in
these muscles, their spasms, adhesions and shortening will exert a pull on
their tendons, affecting how the lower legs work. Plate 19 in A Coloring Atlas shows these
muscles and their tendons in the forelegs.
Plates 33 and 34 show those of the hind legs. These are all relatively long, slender
muscles. Techniques that work well are
compression, friction, deep effleurage and connective tissue.
3. Tail. The muscles of the tail are a continuation of
the extensor muscles of the horse’s top line that start at the poll and end
with the tail.
Neither A Coloring Atlas nor Peter Goody
has good diagrams of the tail.
There
are four major muscles in the tail. (1.)
One pulls the tail down; (2.) one elevates it; (3.) one pulls it to the left;
(4.) one pulls it to the right. Tension
and tightness in these muscles can have a great impact on the suppleness and
mobility of the horse’s entire body.
Usually, the massage work done on the upper hamstring attachments will
have a positive effect on tension in the tail, but occasionally I have worked
with horses whose tails were so tight and clamped down against their buttocks
that I could not get my hand between it and the horse’s body.
Techniques that work well on the tail
The type of massage work you do on the tail will improve lateral
flexibility of the tail by releasing tensions that bind the tail vertebrae
together. You will be using the same
type of deep pressure similar to that used on the neck vertebrae. Your aim with this work is to improve
flexibility in the tail by releasing the tightness of the muscles that hold the
tail vertebrae in contact with each other, just as you release tightness and
constriction around other joints of the horse’s body.
First, start by working along the sides of the tail vertebrae, starting
where the tail comes out of the sacrum (the area where there are no tail
hairs). Also work up into the area where
the upper hamstring attachments of the semitendinosus
and semimembranosus attach next to the tail.
If a horse clamps its tail down tight against its buttocks, you will
also do this type of work on the underside of the tail vertebrae as well as
along the sides.
If the horse holds its tail up in the air, work along the top (dorsal)
side of the vertebrae (here you will be working through the tail hairs) as well
as along the sides. You will also do
some deep pressure work where the tail and sacrum connect.
If a horse habitually carries its tail to one side, do your massage work
first on the side to which the tail curves (the contracted side), then work on
the extended side.
As a finish (a stretch), hold some of the long tail hairs at a place
below the tail vertebrae; pull them away from the body to about a 45 degree
angle. (Try to make the tail angle an extension of the sacrum angle.) With the
tail in this position, rock the haunches back and forth longitudinally. Finally, hold the tail out and set up a
vibration with your hands as you apply traction. In this instance you won’t be moving the
haunches, just vibrating the tail.
This completes a full body massage, as I would do it on a horse.
GENERAL THOUGHTS
To this point,
this course has given you the skill to evaluate a horse’s problems (lessons 3,
4 and 5). Lesson 6 showed you the
different massage techniques that are effective and work well on horses, and
finally, this lesson has described the different areas of the body, the
important individual muscles in that area and the most effective techniques to
use to loosen and rebalance them.
Lesson 8 will deal with
remedial exercises that can be used to re-pattern poor gait and movement
patterns evolving as a result of injuries and poor use of the horse’s body.
Professionalism
If it is your
intension to do equine massage on a professional level rather than just on your
own horses, I strongly recommend that you have numerous horse anatomy
books. Each one will give slightly
different information, views and perspectives of the various muscles in the
horse’s body. I have nine horse anatomy
books and use all of them consistently. (And only one of my nine books showed
all of the attachments of the Brachiocephalicus as it
went from the poll to the humerus.)
How you present
yourself to a client is important—look neat,
workman-like and professional. Carry
with you all of the tools and equipment you think you will need; the horse
owner many not have those things available.
Communication
Any time you
attempt to communicate with another person, it isn’t what you say that is
important; it’s what the other person hears, what they perceived that you have
said; that is what has been communicated.
This is particularly true when the information being given is not familiar
to someone, such as using anatomical or medical terms when giving information
to a horse owner.
I find using
horse terms and language familiar to horse owners helps me know I have
explained something in ways the owner will best understand. Imagine the confusion you could cause if you insisted
on referring to the horse’s stifle as the knee (which from an anatomical point
of view it is). Horse owners will know
where the poll is, but maybe not the occiput. If you feel that you have to use medical or
anatomical terms, take the time to explain them.
Take the time
to carefully explain what you are seeing in a horse and answer any questions
the owner may have. You want to be able
to explain to a horse owner exactly what you are seeing and how you anticipate
approaching the problem. Explain at the
beginning that it will usually take a series of massage sessions to resolve a
horse’s muscular problems (my average is three), but assure them that the horse
will show improvement after each session.
If you’ve done
two sessions and there has been no improvement at all, or the horse actually
looks worse, this is indicative of something more than a muscle problem. Suggest that the owner have a chiropractor or
vet look at the horse.
You need to
talk to the owner in ways they can understand; but equally important—YOU NEED
TO LISTEN TO THE OWNER. They know the horse better than anyone else; they’ll
have a lot of information that will be important to you. Sometimes they won’t think to mention
something that will turn out to be important, so encourage them to talk about
the horse.
I worked on a
horse that had not been sound in a hind leg for nine years. When I mentioned that the hock seemed “locked
up”, the owner finally told me the horse had been in a trailer accident nine
years before. She didn’t think to tell
me about it because her vet had told here that she was lucky that the horse
came out of the accident with just a few scrapes on its face.
I found that
the bones in the hock joint had been pushed slightly out of position and it
wasn’t able to flex correctly. When I
released tension in the muscles and tendons that operate the hock, it allowed
these bones to re-adjusted and the horse was able to begin the process of
learning to move correctly again—and this was nine years after the accident.
Some horse
owners are sensitive to any criticism of their horses. You need to develop a way of discussing a
horse’s problems with tact and sensitivity.
Honesty in talking about what you’re seeing is important, but it doesn’t
have to be brutal and insensitive; practice tact!
Nor will you
endear yourself to horse owners if you walk up to them at shows and other
events offering unsolicited advice and enumerating their horse’s problems.
Keep in mind:
you can’t help the horse if you offend the owner and don’t get to work on the
horse.
It
is very unprofessional to discuss a client’s horses with other people. You can talk about problems that you have
encountered in other horses, but not by using names or doing so in such a way
that the horse or owner are easily identified.
“Name dropping” is bad form in any profession unless you have that
person’s permission to use their name.
What you charge
for your massage session will depend to a large extent on the area where you
live and work, however, there are two things I would
like to suggest.
First, if you
travel a lot to reach your clients (at one time I worked on horses from Miami
to Tallahassee) your charge needs to include your travel expenses, but some
trips are short and some are long. I
tell my clients that I charge a flat rate for the massage and a travel charge
that varies, depending on how long I have to travel. (I don’t charge by the mile; I charge by how
long the trip takes.) In this way all of
my clients understand that what I charge one person could be different from
what I charge another, but they will know why.
Second,
sometimes you may be inclined to charge less then your standard fee. If you do so, be sure that the owner knows
that this is a discounted, or special, price.
Tell them what your usual charge is and that the rate you are charging
them is a discount. This way you avoid
having clients wonder why you charge some people more than others, or why you
suddenly seem to raise your rates.
Organizing Your Massage Session
I suggest you
have some type of chart to document your massage session, and give this to the
owner. If you want a copy for your own
files, have some system for multiple copies.
I don’t make copies for myself. I
have a file card with the owner’s name, address, phone number and directions to
their house. This card also has a
description of the horse, some of its important history and its problem. My reason for doing it this way is that there
will be improvements after each massage and I want to evaluate each horse as
they are when I see them, not as they were one or two weeks before.
I don’t want
any preconceived notions about what I will be seeing (outside of knowing what
the major problem was). I want to see
the horse as it is now.
The chart I use
has sketches of a horse in left and right side views, front and rear views and
one of the abdominal area (the horse lying on its
back). There is a section for me to
record my initial observation of the horse—its attitude, conformation and
movement.
In the next
section, I describe what I found during the massage. I also make marks on the sketches showing the
places where the horse was tight or sore.
The final
section is for my recommendations following the massage. These would include when a next massage would
be appropriate, when to resume working the horse and, if appropriate, some
remedial exercises, either under saddle or from the ground, that will help
re-pattern the horse’s movement and way of using its body.
Along with this
chart I also attach a short write-up about the type of massage I do, explaining
the process and what the owner can expect from structural integration massage.
Unless you are
at a show or event where you are doing basic relaxation massage at the end of
the day, I ask that a horse not be worked the day after the massage. After that, if the horse is working under
saddle I ask that the horse be worked as usual for a number of times. I ask the owner to note where they see and
feel improvements and where there are still problems.
How close
together should massage sessions be? If
you are working on a specific problem, sessions that are one to two weeks apart
seem to work the best. Changes in a
horse’s body will continue for a number of days after a massage and you want to
give that process time to complete itself, so normally
you would want to have at least a week between sessions. But if the interval between sessions goes
much beyond two weeks, the horse’s body starts to lose some of the benefits of
the first massage and you won’t have that base to work from—some things will
have to be re-done.
Horses at shows
and other competitive events can benefit greatly from massage, but it should be
done long enough in advance to allow the horse time to integrate the new
releases into its body. Usually the
night before is ideal.
Massage done at
the end of a day of showing will relieve the stress of that day and ensure that
the horse will get a good night’s sleep and be fresh for the next day’s classes
or competition.
Massage done after
a performance should wait until the horse’s body systems have returned to
normal – 2 to 3 hours.
If you are
doing “pre-event” stimulation massage it should be done shortly before the
start of an event. (Review stimulation
massage in lesson 1.)
Maintenance
massage for the average horse can be done on any schedule that seems to work
best for the horse. Once a month seems
to work well for most horses; but for horses in heavy competition it should be
done frequently and adjusted for the horse’s needs.
How long should
a massage last? It depends on the
purpose of the massage. If you’re doing
relaxation and maintenance massage, without specific problems, I usually spend
about an hour.
If it’s
post-event massage, bringing body systems back to normal after competition, 45
minutes to an hour will usually do the job.
Pre-event
massage to stimulate body systems prior to competition is not usually done on
horses (as far as I know), but if you did so it would be quick and brisk and no
more than 15 to 20 minutes.
Massage
sessions that are being done for injuries, gait abnormalities and structural
balance problems take longer. My average
session is 1.5 hours. A first session
may take a little longer. This is actual
bodywork time. I factor in at least another
½ hour for evaluation and getting a history.
Be sure you prepare a new client for the time involved. Many will seem surprised that you will need
at least two hours. I also explain that
one session rarely corrects these kinds of problems and three sessions is the
average.
Explain that
the subsequent sessions will need the same amount of time because in each
session you will be moving outward from the original problem site to adjust any
compensation problems that have occurred in other areas of the body.
Some Other Thoughts
An important rule to remember in your
massage: release the tight contracted muscles first. In this way they are ready to stretch when
you release the muscles that are “stuck” in extension. A good example – with a horse that contracts
his torso on the right side and has difficulties bending to the left, loosening
the right side first (the concave side) will have it ready to stretch as the
muscles on the left side loosen and begin to contract.
Another good
example is a horse with a tight back and poor abdominal tone. This horse will have difficulties contracting
abdominals and raising its back if the back muscles are tight – loosen the
contracted back first.
Tranquilizers and muscle relaxants interfere
with effective massage. They relax the
entire body—all of the muscles.
Structural massage is not just about relieving soreness; it’s also about
changing relationships between muscle pairs and groups of muscles in order to
rebalance the body and prevents the soreness from returning.
Tranquilizers
and muscles relaxants will relieve acute pain (mental as well as physical), but
when they wear off there is no change in the relationships; the problem is
still there and will resurface again.
You cannot get
a good evaluation of a horse’s problems if they are on any kind of pain
medication, such as “bute”. Don’t evaluate or work on them until the
medication is out of their system and you can see how the horse is really
feeling about its body. If the
medication has been prescribed by a vet, you should NOT CONSIDER doing massage
on a horse without talking to the vet and knowing the treatment.
I was once
asked to do massage on a horse that was “off” and under a vet’s care. When I asked the vet about the horse, he told
me that the horse had no joint fluid in one hock. Massage will not help that problem.
I believe
massage works best if you work both sides of the horse, balancing the two sides
as you go. I usually change sides as the
horse moves back and forth away from my pressure.
If you’re doing
massage in an area and you’re not getting results (there are no visible signs
of the muscle relaxing), it could be that you’re simply working in the wrong
place—move to a different spot. You
might move a few inches or to a different area and find a place where you are
feeling results. Sometimes an area or
muscle can’t release tension until another muscle lets go. You may go back to your original spot later
and find that you are getting results.
Massage will
generate heat as tight muscles loosen, and you may feel and see an area start
to sweat as the muscles release. The
amount of sweat generated is a good indication of how much tightness there was. I once worked on a horse at a show that was
looking “off” in one shoulder. As I
worked on the shoulder (Infraspinatus) the area
started to sweat to such an extent that the sweat was running down the
shoulder. I saw the owner at a later
show and was told that the horse was going very well and had no more problems
with the shoulder. It will be rare that
you would see that much sweat as a muscle loosens, but feeling heat and some
dampness is common.
Is massaging
horses in cold weather productive? In my
experience, it’s absolutely pointless to try to do massage on a cold horse in
really cold weather, but you can be effective if the circumstance are
right. The most important thing is to be
able to get the horse out of the wind. Obviously,
if you’re in a heated barn there is no problem.
If the barn is unheated, you can keep the horse’s blanket on and fold
back sections as you work; you could even work up under the blanket in some
spots.
If the nights
are chilly or cold, but the days warm up, make your appointments for late
morning or early afternoon rather than early morning. If the day has warmed up, but the horse still
appears stiff and cold, 10-15 minutes of longeing
will get the muscles warmed up enough for your massage to be effective.
If there is no
way for you to get the horse out of a cold wind or very cold weather, the best
thing to do is reschedule the massage.
How do you know
if the horse you’re massaging needs a chiropractor? There are two ways that bones can be out of
alignment at the joint where they meet (what chiropractors call subluxation).
First, they can be pushed out
of place laterally—one can be off to the side of the other. This is the most common type of
displacement. Second, they can be
“jammed up” longitudinally—one can be pushed up over the edge of another.
If a bone is displaced
laterally, you may be able to feel that the line of vertebrae is not
straight—one bone will be off to the side.
If there is a longitudinal displacement, the bones will be in line, but
there will be a “lump”.
Both lateral and longitudinal
displacements could be caused by tightness of the muscles around the bones, or
some type of trauma or accident could have jammed the bones out of alignment.
If tight muscles are causing the
problem, the bones will settle back into place as your massage loosens and
rebalances the muscles. If the bones are
“jammed” out of alignment, your massage will not change their position; the
lumps or waves will still be there when you’re finished. You may even find that the area becomes more
sensitive or sore as you work on it.
This is a very good signal that it’s a chiropractic problem.
As you gain experience, you
will be able to tell after a first massage if a chiropractic problem is
compounding the situation. But if the
horse you are evaluating shows significant movement problems, gait
abnormalities or issues with its head, it can be helpful to have a chiropractor
look at it before you begin your massage sessions. In this way you will know that what you are
dealing with is purely muscular and you won’t have to question what you are
feeling.
There are four places where
you will find chiropractic misalignments in a horse. They are:
1.
The joint between the skull and the first neck vertebra (Atlas)
2.
The joints between the rest of the neck vertebrae
3.
Along the vertebrae of the back
4.
The lumbar/sacral connection
1.
Chiropractic misalignment in the joint between the skull and first neck
vertebra is common. This is often very
noticeable to a rider sitting in the saddle; when the horse’s neck is straight,
they will see the head as tilted or turned to one side. Usually, the horse will be defensive about
having its head, ears and upper neck touched.
2.
Neck vertebrae will frequently be out of alignment, and this can occur
anywhere along the length of the neck.
Usually, displacements of the neck vertebrae will be lateral.
To test for this, hold the neck between your hands, one on each side and
across from each other. Move your hands
up and down the neck. If the vertebrae
are in normal position, the bulge of the vertebrae will feel the same under
your hands. If there is any kind of
lateral displacement, one side of the neck will feel bigger than the other.
If there is a longitudinal displacement (one vertebra pushed up hard
against another), it will stiffen the neck in a “ewe-necked” position.
As I mentioned when describing the cervical (neck) portions of the
Serratus muscles, loosening the Serratus attachments and doing positional
release techniques will frequently realign the lower neck vertebrae if it is
muscle tension that is responsible for the misalignment. I have not found the upper neck vertebrae
easy to realign with massage or positional release. Usually, I suggest having a chiropractor look
at the horse.
3.
Misalignment of vertebrae in the horse’s back will show as a lump along
the spine (longitudinal displacement) or as a wave or curve in the spine
(lateral displacement) that doesn’t soften and smooth out from your massage,
and, in fact, as you work on the back muscles the horse may begin to show
greater discomfort rather than relief.
The back muscles could have tightened up to protect the area (splinting). As you work on them you are taking away the
support and putting pressure on the misaligned joint.
4.
The joint between the last lumbar vertebra and the sacrum is an
extremely important one. Any
misalignment here will throw the horse’s entire body out of balance. Any significant pull or jerk on the
hindquarters is very likely to pull this joint out of alignment. A fall or hyper-extension of a hind leg could
do this. A stumble or catching a foot
over a jump could do it.
Some problems that can be caused by tension and misalignment in this
area are troubles with one canter depart and one hind leg not able to come up
under the horse’s body. If a
misalignment is severe, you could see, when standing behind the horse, that the
hips are not level—one hip will be lower than the other. If this misalignment is of long duration, you
will see a different development of the haunch muscles—one will drop off
straight and the other will be round.
Click Here To Take
the Quiz – Part A
There
are 100 questions; each question is worth one point.
Quiz
- Part B consists of descriptions of actual situations
that I have dealt with when massaging horses.
From the information that I give you, plus information contained in all
of the lessons, I will ask you to come up with an educated opinion about the
situation I describe based on all of this information. I’m interested in more than just your
answer. I want to know not only what you
think is wrong, but what you would do about the situation, how would you handle
it. I’m interested in your thought
processes—the thinking that brought you to your answer. Each answer will be worth a maximum of 10
points.
Please send your report to b_blink@bellsouth.net Enter Lesson 7 Part B Quiz in the Subject
Line.
Assignment:
Lesson 7 is the core of this course. The lesson has taken you through the horse’s
body area by area, describing common muscle problems in the various areas and
talking about the massage techniques that are the most effective in each area.
Previous
lessons have described the anatomy and movements of a horse, described how to
take a history of the horse, looked at its muscle development and movement and
evaluated where muscle problems may be located.
Lesson 6 described and showed the various massage techniques you can
use. You will be bringing all of this
information together in this assignment.
To
prepare for this assignment you should have been practicing massages on
numerous horses following the instructions in the lesson and practicing until
you feel comfortable and are ready to be evaluated.
When
you are ready, you will send videos of you doing massages on three (3)
horses. These will allow me to evaluate
your work, discuss your massage techniques and make suggestions. Please load the videos to a video hosting web
site; for example YouTube or Photo Bucket. Then send me the link.
• I would like these massages set up in the following manner. Do horse #1, load this video to the web and
send your video link; wait for my comments and evaluation before doing the next
horse. In this way you will be able to
incorporate my feedback into your next massage.
You will be asked to do each horse in a different way; follow the
directions for each.
As
you prepare to do these massages, there are some suggestions I would like to
make.
1. Do your massage in a quiet place with few
distractions.
2. Find a place where there are no loud
noises or fans so that I can hear your comments.
3. If it’s a windy day find an indoor or
quiet, sheltered place to do your massage – or re-schedule for another
day. Wind, with all its new noises and
smells, can be very distracting to a horse.
4. Have the horse tied short enough that it
can’t get its head down to the ground.
Also, tying short will allow the horse to move sideways, which you want
it to be able to do, but not able to move backward away from you.
5. Make sure the light is good, without
shadows or filtered light; I need to be able to see what you are doing. If you take a break, check before you start
again to be sure the light and shadow patterns haven’t changed.
6. If it’s very cold, it’s better to wait for
a warmer day unless you have access to a warm barn. If you try to work under and around blankets
it will not allow me to see all of what you are doing.
7. Work back and forth from one side of the
horse to the other as you massage rather than doing all of one side before
doing the other. You want to bring
balance to each area as you work through the horse’s body.
8. If there is anything you’re not sure of –
if you have any questions – ask for clarification.
I
will be asking to see different things on each of the three horses, starting
with a demonstration of your basic massage techniques on horse #1. On horse #2 you will do a basic full-body
maintenance type massage and with horse #3 you will choose a horse with some
obvious problem and do an analysis of the problem and the therapeutic massage
that would be appropriate for helping or correcting the problem.
HORSE #1
This
will be a demonstration of the various techniques that were described in lesson
6. You will go through the horse’s body
in the same sequence as I did in this lesson, starting with the horse’s back,
and demonstrating all of the massage techniques that were covered. I would like you to show me the area you’re
going to work on and tell me which muscles you’ll be working on. Describe and trace the outlines of the
muscle’s shape with your finger tips.
Talk about the direction in which the muscle fibers go and what kind of
work the muscle does. Then demonstrate
all of the suggested techniques for that area, telling me if you are going with
the muscle fibers, across the fibers or in a circular or semi-circular
movement. Talk about the speed and depth
of the massage you are doing, why you have chosen that particular speed and
depth and how the horse is responding.
(Review the section on pressure at the beginning of this lesson.)
Use
a horse that is not extremely tight, sore or hyper-sensitive; choose one that
allows you to demonstrate your skills.
Demonstrate your massage on both sides of the horse.
This
massage may be done in sections rather than all at one time if you wish to do
it that way – seeing the flow of the massage from one area to another is not
necessary in this demonstration. You
may, in this demonstration, do all of one side of the horse before doing the
other side.
HORSE #2
This
will be a full-body massage done in one session showing the techniques
appropriate for each area and the progression and flow from one area to the
next.
In
this video, introduce the horse and give its history. Show video of the horse from both sides and
front and rear. Discuss the horse’s
muscle conformation pointing out areas of tightness and restrictions as were
discussed in lesson 4. If you feel that
there are aspects of the skeletal conformation that are contributing to the
horse’s tightness and movement restrictions, mention those.
Show
the horse moving on a longe line or in a round
pen. First, talk about how the joints of
the legs (fronts and hinds) are working.
Then discuss the horse’s top line; is there anything that you
particularly notice about the horse’s top line as it moves. Then add comments about anything else that
seems important to you. Do the things
you are seeing as the horse longes confirm what you
saw when it was standing still, or do you feel there are contradictions?
Start
your massage with the long back muscles.
As you progress through the massage, describe the techniques you’re
using, discuss what you are feeling in the muscles as you work. Is this horse primarily the “tight” type or
the “sensitive” type? Comment on the
horse’s responses to the work you are doing.
You will do your massage on both sides of the horse. Talk about the differences in how the horses’
muscles feel and respond on the two sides of its body.
As
in horse #1, use an easy going horse that will give good responses to the
massage. The horse may have some
tightness or soreness, but nothing that makes it defensive or
hyper-reactive. You might want to use
that type of horse for massage #3 where you will be dealing with massaging a
horse that has obvious problems.
HORSE #3
For
your third massage, I want you to choose a horse that has an obvious problem
that is affecting its comfort or movement.
Problems might come from one of the following sources.
1. Poor
conformation (either muscular or skeletal) that interferes with correct
movement and causes soreness – sway back, ewe neck, flat croup, extremely long
hind legs, etc.
2. Tight
muscles that interfere with movement – hindquarter stiffness, imbalance in the
loins, shoulders out of balance, neck stiffness
3. Body
soreness caused by bad saddle fit, hoof or dental problems
4. Old
injuries
5. Does
it appear that the problem is primarily a physical one, or is there also a
mental component?
Introduce
the horse, give its history, do a body reading of the horse standing still and
moving, preferably on a longe line or in a round pen,
but if the horse is not able or comfortable doing this, walk the horse in big
circles on a lead line.
In
evaluating the horse moving, as with horse #2, talk about the leg joints and
the top line, but also talk about how the horse organizes its body
longitudinally and laterally, discuss any restrictions in movement and where
the horse may be protecting areas of its body.
Talk
about what you see as the horse’s major problem and how you are going to
organize your massage to address this problem.
As
in your second massage, describe the muscles you are working on – their shape,
their function, the direction of the muscle fibers, whether they are tight or
sore, the type of pressure you are using, and what changes you feel in the
muscles as you massage. Since this
massage is for a specific problem rather than over-all maintenance as on horse
#2, describe your progression from one area of the body to the next and your
reason for doing it that way.
At
the end of this massage talk about what you feel you were able to accomplish
and if you think it will take more than this one session to resolve the
problem.
If
your work on this horse leads you to believe that there are dental or hoof
problems that need to be addressed, or you think a chiropractor might be
necessary, tell me why.
If
there’s anything you’re not sure of, if you have any questions, feel free to
ask for clarification. Contact me at: bllindquist34@gmail.com
Please
send the links to your videos to bllindquist34@gmail.com
I
have one last suggestion. In teaching
this course I have become aware that some students have limited massage
experience - or none. They have never
experienced massage for themselves and it is difficult to do something well if
you have never felt it yourself.
Many
people's perception of massage is limited to simple relaxation (Swedish)
massage, but, as you have learned in this course, there are many other types of
massage whose intent goes beyond relaxation and into therapeutic massage that
can relieve soreness and muscle tension on a more permanent basis and is also
capable of restoring correct movement.
All
effective massage involves the use of pressure and the development of
"feel" on the part of the massage practitioner. One of the best ways of understanding this
use of pressure and developing feel is to experience massage for you. All human massage schools teach massage by
having the students give and receive massages.
If you have never had a massage, or if the only ones you've received
were relaxation, I would strongly recommend that you get some massages for
yourself. (This is not a requirement,
only a suggestion.) This would give you
an opportunity to experience what it feels like and how your body responds to
the pressure. I would also suggest that
these massages be either sports massage, deep tissue
massage, neuromuscular trigger point, or structural massage. If you've never had massage, you could get
one relaxation massage in order to compare it with some of the others. Ask the therapist to work on areas of your
body where you have tension, pain or old injuries.