Equine Massage
LESSON SEVEN
PART
TWO
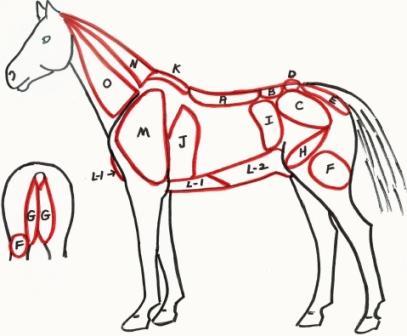
I. AREA BETWEEN LAST RIB
1. Peter Goody – diagram 2 (page 13), diagram 4
(page 20)
2. A Coloring Atlas – plates 16 and 17
This one small area has a number of muscles attachments that are very
important for the forward/backward swing of the hind legs, correct bending,
lateral movements in the hind legs and canter departs. The ones that you will be affecting the most
with your massage are:
1. The muscle portion of the Tensor fascia latae
2. Iliacus (under the
Tensor fascia latae)
3. External oblique
4. Internal oblique
5. Transverse abdominis
Improper balance and tightness in this area can prevent the hindquarters
from working correctly. Often, what
appears to be a problem with the working of the hind legs is actually tightness
in this area (or in the loins).
Techniques
The best techniques will be direct pressure with thumb and finger tips,
cross-fiber friction with thumb or braced fingers, and compression with a stiff
rubber curry comb. This whole area is
very important, be sure to work all around the edge of
the point of the hip, the area between the point of hip and the last rib and
along the “ropy” edge of the Iliocostalis. Again, adjust your pressure to the tightness
or soreness of the area.
J. AREA BEHIND THE SHOULDER
1. Peter Goody – diagram 3 (page
17) and diagram 4 (page 20)
2. A Coloring Atlas – plates 16,
17, 21
3. Diagrams from lesson 2
This area contains two very important forehand muscles – the thoracic
Serratus and the muscle portion of the Latissimus dorsi.
• THORACIC SERRATUS
The entire Serratus muscle, thoracic and cervical portions (in
conjunction with the pectoral muscles of the chest) is active in lifting the
forehand and arching the horse’s neck.
This muscle is composed of thirteen long slender “fingers” that converge
into a muscle mass on the inside of the shoulder blade, at the top, just under
the Rhomboid attachment. These muscle
“fingers” attach to the lowest four neck vertebrae (cervical 4, 5, 6, and 7) and
the first nine ribs. In our massage we
can access all four of the cervical Serratus and those attaching to ribs 6
through 9. Those attaching to the first
five ribs are under the shoulder blade and not accessible, but your massage of
the others, because of their common origin, will have a positive effect on
these as well.
When this muscle is working correctly, the contraction of its thoracic
“fingers helps lift the front portion of the rib cage and, along with the
abdominals, is a very important component in the process of lifting the horse’s
back.
If the Serratus is not contracting properly, the lower portion of the
chest and neck sink downward and you’ll see a horse that is “on the forehand”
and very possibly “down in the back” and “ewe-necked”.
Soreness in the thoracic Serratus is a common cause of girthing
problems.
The cervical portion of the Serratus lifts the downward curved section
of the neck vertebrae (lower neck).
There will be more about the cervical Serratus in Section O—other neck
muscles.
• LATISSIMUS DORSI
The other important muscle in this area is the belly portion of the Latissimus dorsi. This is a broad, flat, thin muscle. Remember from lesson 2 that the portion that attaches
to the vertebrae of the back is fascia (connective tissue) and the portion that
attaches to the humerus in the lower shoulder is a
tendon. The belly of this muscle
over-lays a portion of the thoracic serratus.
This muscle is an extensor; its job is to stretch, allowing and
supporting the forward swing of the front leg; then it contracts as the leg
swings back. Any tightness, soreness,
spasms, trigger points or adhesions in this muscle will interfere with the full
swing of a front leg.
Techniques
Massage done over the area behind the shoulder will loosen and rebalance
both the thoracic Serratus and the belly of the Latissimus
dorsi.
Notice that the muscle fibers of these two muscles go in different
directions. As you massage, when you’re
going with the fibers of one, you’ll be going across the fibers of the other;
so almost any direction in your massage will be beneficial.
Start with broad strokes of back and forth friction and deep effleurage
over the entire area. Circular motions
and compression are also very effective.
You can usually use a good amount of pressure here unless the area is
very sore. Tools like a small stiff
curry comb or Grooma work well, but the area is too
“fleshy” for muscles combing to be a good choice.
Soreness in this area can come from over-extension of the front legs
(extended trots, jumping), but also from poor saddle fit and girthing
procedures.
K. WITHERS
1. Peter Goody – diagram 4 (page
20)
2. A Coloring Atlas – plate 17
The area over the withers has attachments for two important
muscles. One is the Trapezius
of the superficial layer, which I’ll talk about with the shoulder area. The other muscle, under the Trapezius, is the Rhomboid.
The Rhomboid covers the withers and also stretches up the crest line of
the neck to the poll.
The Rhomboid has two essential functions. First, it attaches the top of the shoulder
blade to the withers. The shoulder blade
hangs suspended from the withers by this muscle, making it the pivot point for
the swing of the shoulder blade.
Its other function, in conjunction with deep ligaments, is to support
the neck along the crest line and facilitate its stretch. Massaging the neck portion of the Rhomboid
will be part of the section dealing with the neck.
At the withers, the Rhomboid is a short, strong muscle; its origin
attaches directly to the bones of the withers (the spinous
processes or ribs 2 – 6). Its insertion
is to the top of shoulder blade, on the inside surface.
Common reasons for soreness in the withers are a saddle that does not
fit correctly or one that has been placed too far forward over the
withers. A saddles that is so wide or
ill-fitting that it touches and puts pressure on the wither bones can lame a
horse, sometimes permanently. The
presence of white hairs on the withers often indicates that there has been, or
is, a saddle problem.
Techniques
The muscle fibers run straight from the withers to the shoulder
blade. You can use techniques that go
with or across the muscle fibers.
Working across the fibers will separate them,
going with the fibers helps them stretch.
Friction works very well in this small area, but compression and muscle
combing are also appropriate. Depending
on whether this muscle is tight or sore, you can use either your finger tips or
curry comb.
One technique that I like involves reaching over the withers and pulling
toward me with finger tips. This would
be using a combination of finger tip compression and rocking.
Another effective rocking technique for the withers has you placing one
hand on the side of the neck just in front of the withers, the other hand
reaches over the withers, hooking fingers into the wither bones. Now, push against the neck and pull the
withers toward you. Set up a rocking
motion by alternating the push and pull.
These rocking techniques also loosen other muscles in the forehand and
base of the neck and will help in balancing the forehand.
L. BELLY LINE
1.
Peter Goody – diagram 3 (page 17), diagram 4 (page 20), diagram 13 (page 45)
2.
If you have “An Atlas of Animal Anatomy for Artist” by Ellenberger, Dittrick and Baum, there is a very good diagram showing a view
of the belly/chest of the horse.
This section deals with massaging the entire underline of the horse, but
I have divided it into chest muscles and abdominal muscles.
(L – 1)
Chest muscles – behind, between and in front of the forelegs
(L – 2)
Groin and abdominal muscles
The major muscles of the belly line, both pectorals and abdominals, are
flexors—their job is to contract.
• L – 1 THE CHEST MUSCLES (pectorals)
Three of the horse’s four pectorals are in this area (the fourth is in
front of the shoulder blade). These
pectorals are flexors that support the rib cage from the bottom and both
stabilize and allow movement of the front legs.
Frequently these muscles, as well as the abdominals, are tight in an
extended state and do not contract properly.
When these pectorals are in that extended state, without good capacity
for contraction, they allow the rib cage to settle downward, preventing them
from doing their part in elevating the forehand for collection. Your job will be to loosen these muscles so
that they can contract and extend correctly.
The three pectorals all have their origin along the edge of the breast
bone (sternum) and all three attach at different places on the humerus. You will
find different names for these pectorals in various anatomy books. For my purpose of describing them for you and
to simplify and avoid confusion, I will talk about them in relationship to the
forelegs. You can choose which of the
anatomical names you wish to use for them.
(I am describing these muscles just on one side of the horse, but you
understand that they occur on both sides.)
There is a pectoral behind the forelegs, one between the forelegs and
one in front of the forelegs.
Massage
Techniques
A.
Pectoral behind the forelegs – this is a fairly long muscle that starts
in the area near the elbow and runs back along the belly line to the end of the
rib cage. The muscles fibers also run in
this direction.
1.
First, with finger tips, use deep pressure where this muscle attaches to the
breast bone (sternum).
2.
Next, with your hand or rubber curry, use deep effleurage or broad (rather than
finger tip) friction over the entire surface of the muscle, going with and across
the fibers.
3. If the muscle is
very tight, do some muscle combing with one of the tools.
B.
Pectoral between the forelegs – this is a short, broad muscle that goes
from the inside of the humerus to the breast
bone. If it is tight, its attachment on
the inside of the elbow can inhibit the forward swing of the humerus. You will
want to pay attention to releasing tension at this point.
1.
Use finger tip deep pressure where this muscles attaches to the breast bone.
2.
Do friction on the inside of the elbow, up along the inside of the humerus and across the muscle between the humerus
and breast bone.
3.
This muscle also goes down into the foreleg, attaching to the radius. Peter Goody’s book shows
this quite well (diagram 13). Do
friction on this attachment.
C.
Pectoral in front of the forelegs – looking at the horse from the front
you’ll see it as a “fleshy” muscle—what we think of as the chest muscle.
1. Use deep finger
tip pressure along the breast bone attachment.
You will be able to feel the front point of the breast
bone—work from that point down to the front legs.
2. Do friction where
this muscle attaches to the humerus.
3. Do kneading in the
fleshy part of the muscles.
Once these muscles have been loosened by
massage, there are some finger pressure techniques that I use to confirm that
the muscles can now contract properly and lift the forehand. These techniques also allow the horse to
become aware of new possibilities in the way its muscles can work.
Techniques for Raising the Chest.
The following maneuvers will raise the horse’s
back behind the withers (under the saddle).
You will be working on the pectoral behind the front legs.
1.
Stand facing the horse’s side. Starting
where the muscle attaches at the
end of the rib cage, put your fingers into the muscle a few inches away from
the breast bone. Use your thumb or
braced fingers to push up into the muscle, then push forward, going toward the
front of the horse. Your pressure needs
to be up as well as forward. You want to
feel like you’re actually pushing the back up; and you want to see the back
rise, even if only a small amount—but you would like to see it rise a lot. If the horse’s back doesn’t give some lift,
do more massage work on these pectorals, especially muscle combing, and try
again.
2.
Now, go to the other side of the horse and reach just across the mid-line of
the belly (your fingers will be on the side you have been working on). Push up into the muscle with your finger tips
and then pull toward you. Repeat this,
moving your fingers forward along the edge of the breast bone from mid-belly to
the front legs. Again, you want to feel
and see the area behind the withers (under the saddle) rise.
3. Repeat this on the other
side.
Technique for Raising the Withers.
For this maneuver you will be working on the pectoral between the front
legs. It requires that you use both
hands. When it is combined with the
techniques for raising the horse’s back behind the
withers, the entire forehand will elevate.
1.
Place one hand at the back edge of this muscle, put
the other at the front of the muscle.
2.
Using thumb pressure, one hand is going to slide into the pectoral, coming from
the back; the other will slide between the legs,
coming from the front.
3.
Press upward into the muscle and then push your thumbs toward each other.
4.
Your thumbs should meet between the front legs with upward pushing pressure.
5.
Push up with both thumbs. This upward
pressure should cause the horse to lift its withers.
You should feel and see the withers rise.
6.
Repeat on the other side.
These chest muscles can be extremely tight on many horses. If these techniques do not lift the forehand,
go back and do more massage work on the muscles.
• L – 2 GROIN
I have left describing massage in the groin and belly muscles until now
because of safety considerations. Many equine
massage routines do not deal with this area at all, but doing so is very
important for bringing all of the parts of the horse together into a working
whole. It cannot be ignored. But it is important for you to know how to
work in this area safely.
When a horse feels a touch in the belly, kicking at that touch is a
common reaction; be prepared for that.
Some horses will just pick up a foot, some will kick up toward their
belly, some will kick out at you. With horses that you do not know, it is safer
to let the horse get accustomed to pressure on its belly line by first working
in the chest area (as well as on the adductors) before going to the abdominals
and groin. But once the horse is
comfortable with pressure in this area, you can do either chest or abdominals
first, depending upon what seems appropriate for the horse’s problem. Whether you work on this area in a first
massage is really a judgment call based on a horse’s degree of soreness, where
the major problem is and the sensitivity level of the horse. If they’re defensive about this area at
first, they will usually let you work there in your second session.
We are dealing with three major muscles in this area – the Internal
oblique, the Rectus abdominis and the lower edge of
the External oblique.
1.
Peter Goody – diagram 3 (page 17) – This shows the attachment of the External oblique to the abdominal fascia
(heave line). Diagram 4 (page 20) shows
a cut-away of the abdominal fascia showing the Internal oblique.
2.
A Coloring Atlas – plates 16 and 17 show the same muscles.
• Internal oblique
The Internal oblique goes from the point of the hip down to the center
of the belly line in the area we call the groin. It is triangular in shape and acts as a
“sling”, supporting the intestines.
• Rectus abdominis
The Rectus abdominis is a strong flexor and is
important for the support of the horse’s back.
I have not seen an equine anatomy book that has a good diagram of the
Rectus abdominis; they all show just the abdominal
fascia that covers the entire abdominal area, with a cut-away showing the
Internal oblique. Diagrams of the human
Rectus abdominis will give a good picture of what
this muscle also looks like on the horse.
It’s composed of two long muscles on either side of the center line of
the belly. They run the length of the
belly from attachments on the rib cage to the front of the pubic bone. In massaging the Rectus abdominis
you will be working through the abdominal fascia. The only portion of the Rectus abdominis we cannot access easily is that which is under
the sheath or teats.
When the Rectus abdominis is working
correctly, the contractions lift the horse’s back and pull the pelvic bone
down. This allows the hind legs to swing
forward under the body, giving them more thrust and power.
• The External oblique
This is a very thin muscle that covers the sides of the horse’s rib
cage. Its lower edge connects to the
abdominal fascia. Tightness along the
lower edge of this muscle inhibits the movement of the rib cage and the
expansion of the lungs. This edge is the
tight line we see in horses that have heaves.
Techniques
The skin in the abdominal area is sensitive, the only place were tools
would be appropriate would be along the lower edge of the External oblique.
I have two positions I use when standing next to a horse to do massage
in the groin. One is to stand close,
next to the hind leg, either facing the horse or facing somewhat forward. I will have one forearm (the right if I’m
working on the left side) lying on the horse’s side just above the stifle. In this way I can exert downward pressure on
the stifle if the horse tries to lift the leg or kick. Sometimes I will stand forward of the stifle,
facing the horse’s belly, so that I can bring a hand into the forward portion
of the belly and work backward. You’re
more exposed to a kick from a hind leg when you’re in this position so it’s
best to wait to use this approach until the horse is comfortable with belly
line work.
Work in the Groin (Internal oblique)
1.
You will have already done work around the stifle when you worked on the
quadriceps, so start by touching the outside of the stifle, then slide your
hand to the inside of the stifle, allowing the back of your hand to touch the
abdomen. This is the horse’s introduction to your touch. The muscle under the fascia here is the Internal oblique. You
will use your finger tips, the heel of your hand or the back of your fist in
your work.
2.
Using with finger tips, you will first do connective tissue massage on the
fascia. Start near the stifle and move
up the groin with a gliding pressure, moving toward the pubic bone area. Remember—this is the techniques where you
want to feel like you’re moving toothpaste around in a tube. Repeat until you feel the area soften a
little.
3.
Now, working in the same area, use more pressure in order to affect the muscle
under the fascia. You can use the heel
of your hand, the fist or heavier finger pressure. When the horse responds to this pressure, you
will feel the area lift slightly.
4.
Next, using the same gliding pressure, start next to the stifle and work
forward toward the rib cage and downward toward the belly line. You can now use heavier pressure—use as much
as the horse allows. I will stand either
with my shoulder against the stifle and work toward the rib cage, or sometimes
I find it easier to stand more toward the shoulder, facing to the rear, and
work from the rib cage toward the stifle.
The choice will really depend on how the horse responds to what you’re
doing.
Work
on the External oblique
1.
Work along the lower edge of this muscle using deep effleurage, compression and
broad stroke friction. Start at the point
of the hip and work toward the elbow.
You can use heavy pressure along this line and a stiff curry comb works
well.
Work
on the Rectus abdominis
1.
Do connective tissue massage first, using finger tip pressure along the length
of the muscle from its rib attachments to the sheath or teats. In a male horse, you can usually work along the sides of the sheath. A mare might allow you to do some pressure
work between the teats.
2.
Next, you will use heavier, upward pressure that will affect the muscle, using
your thumbs, fingers or fist.
3.
The last thing that you will do in this area is ask the horse to lift its back
behind the saddle. (Your work on the
pectorals lifted the back under the saddle.)
You’ll use the same technique as you did for lifting the chest and
withers. Stand on one side of the horse,
reach across the center line of the belly and, with finger tips, push up into
the muscle and pull toward you. You can
use one or both hands to do this. Do
this in a number of places along the belly line. Rocking the torso at the same time can help
the lift.
M. SHOULDER
1. Peter Goody – diagram 3 (page
17), diagram 4 (page 20)
2. A Coloring Atlas – plates 16
and 17
There are five important muscles in the
shoulder area.
1.
Supraspinatus
2.
Infraspinatus
3.
Deltoids
4.
Triceps
5.
the fourth pectoral
1.
SUPRASPINATUS and 2. INFRASPINATUS
These muscles lie on the surface of the shoulder blade, one on either side
of the spine of the shoulder blade and are covered by the Trapezius
and the Deltoid. These are long muscles
that are almost totally attached to the shoulder blade. Their insertion is to the head of the humerus, which is just a short distance away. This means that there is only a small portion
of these muscles that has the capacity for good contraction and extension. Their major job is to support and stabilize
the shoulder joint as it opens and closes.
They are subject to both stress points and trigger points.
Techniques
It is easy to work on these muscles through the Trapezius
and Deltoid. There are a number of
massage techniques that work well here.
Because there is bone behind them, you can separate the muscle fibers by
pushing the muscles against the bone.
Compression and deep effleurage are good techniques for doing this. Friction and muscle combing are also
effective techniques for this area. Work
primarily up and down these muscles, rather than across—go with the muscle
fibers. You can use your hands or
tools. Use deep static pressure on any
small areas of intense soreness such as trigger and stress points.
2.
DELTOID
The Deltoid is part of the superficial layer and over-lays the Infraspinatus. It is
also involved with stabilizing and controlling the opening and closing of the
shoulder joint. Its fibers run in the
same direction as the Supraspinatus and Infraspinatus
Techniques
All of the massage that you do for the Supraspinatus
and Infraspinatus will also be affecting the Deltoid.
4.
TRICEPS
The Triceps is an extensor muscle.
It stretches as the muscles in the chest (flexors) pull the humerus forward. Its
contraction returns the humerus to its normal
anatomical position.
Techniques
The Triceps is a large, fleshy muscle that will respond well to
compression (especially “compress and glide”) and kneading. You can go across the fibers and with the
fibers. You may find small, sore spots
(chunky peanut butter) in the muscle. If
so, use deep, static pressure as for stress and trigger points.
5.
4th PECTORAL
I discussed three of the pectoral muscles under Section L (Chest
Muscles). This fourth pectoral lies just
in front of the shoulder blade and runs in the same direction as the Supraspinatus and Infraspinatus. This is a very strong muscle whose
contraction is important in opening the shoulder joint and pulling the bottom
of the shoulder blade forward. Its
origin is on the breast bone (sternum) along with the other three
pectorals. It wraps around the shoulder
joint and inserts on the top portion of the shoulder blade. In horses that are tight in their shoulders
and lower neck, it will feel like a tight, hard “rope” in front of the shoulder
blade.
Techniques
This is not an easy muscle to massage effectively. The massage that you do on the portion in
front of the shoulder will be preparation for getting this muscle to release,
but you won’t really see result until you release tension in the chest and
lower neck. On the portion in front of
the shoulder blade do compression and friction, going across as well as with
the fibers. The massage that you do
along the breast bone (sternum) for the other pectorals will also loosen this
part of this 4th pectoral.
N. RHOMBOIDS—NECK SECTION
1. Peter Goody – Diagram 4 (page
20)
2. A Coloring Atlas – plate 17
As the horse’s neck arcs out into space, it needs strong support muscles
and ligaments to keep it from being dragged down by the weight of the
head. The Rhomboid is one of the muscles
that do this job.
The part of the Rhomboid muscle across the withers not only forms the
attachment for the top of the shoulder blade, but also forms the attachment for
its neck portion as it stretches all the way up the crest line.
The Rhomboid connection to the shoulder blades as well as to the crest
line of the neck explains why tight, restricted shoulder movement and stiffness
in the crest line seem to go together.
Riders often find that if they can get the shoulders moving, the neck
will loosen and stretch; or, if they can get the neck to stretch, the shoulders
will swing better.
Techniques
The neck portion of the Rhomboid is an easy muscle to massage. It is part of the second muscle layer, but
the superficial muscle that covers it, the Trapezius,
is quite thin.
You can massage across or with the fibers. Friction across the fibers will be very
effective in the portion closest to the withers. When going up the crest line, massage with
the fibers, using deep effleurage, “compress and glide” or broad stroke, back
and forth, friction. A stiff rubber
curry is very effective on this muscle.
Horses usually enjoy this crest line work and you’ll see them stretch
their necks as you go up the muscle.
You may find sore or hard spots as you go. These could be trigger points, scar tissue or
adhesions—often from fights or play with other horses. Deep cross-fiber friction is the best
technique for scar tissue and adhesions; static pressure for trigger points.
This muscle is an extensor and it should stretch fully from its anchor
at the withers, but on some horses you may see a dip just in front of the
withers. This dip indicates a tightness
in the muscle (and the ligaments underneath) at that point that prevents the
complete outward arc and stretch of the neck.
This dip can vary from a slight curve to a deep, sharp dip. The deeper the dip, the more significant is
the constriction.
After a general loosening of the entire Rhomboid, you can use deep
friction with thumb and fingers and muscle combing to do specific work on this
constriction. After this deep work that
separates the muscle fibers, you can finish with some rocking. But you need to know that the massage work is
only part of the solution to this problem.
These muscles and ligament are incredibly strong and do not change
easily. Lifting the chest and back and
teaching the horse to move forward from behind is the only way to get this area
to truly stretch, and this takes time.
Usually, it will take six months to a year before you will see this area
fill in. You will need to be able to
explain this to your client.
TRAPEZIUS
I have not discussed massage for the Trapezius
because it is a thin muscle whose primary job is to hold the shoulder blade
against the rib cage. Problems that
affect the swing of the shoulder blade are almost always going to be in the
deeper level. If there is some
restriction in the Trapezius, it will usually get
worked out as you massage the deeper muscles.
This is true for the thoracic (rib cage) portion of the Trapezius (the part under the saddle) as well as the
cervical (neck) portion.
O. OTHER NECK MUSCLES
1. Peter Goody – diagram 3 (page
16), diagram 4 (page 20)
2. A Coloring Atlas – plates 16
and 17
The three muscles in the rest of the neck (not crest line muscles) on
which I concentrate my massage are:
1.
Brachiocephalicus
2.
Cervical Serratus
3.
Splenius
These are large muscles with
important functions and they are readily accessible for massage.
There are many other muscles in the neck that are important for its
correct functioning, but most are deep and not accessible for direct
massage. As the massage loosens and
rebalances the ones we can access, it will also have a positive effect on the
deeper ones.
1.
BRACHIOCEPHALECUS
All through this course I have stressed the many similarities between
horse and human anatomy and suggested that you try placing and moving your own
body in the same way as a horse in order to experience some of the stresses and
tensions the horse’s body may be feeling.
But I cannot find any muscle in the human body that corresponds to the Brachiocephalicus.
This is a long, fairly wide
muscle that has its origin at the poll, just behind the ear. It goes down the neck vertebrae, passes over
the shoulder joint and inserts on the humerus, about
mid-way between the elbow and the shoulder joint. To hold it in place over this distance, it
has attachments on the 2nd, 3rd and 4th neck
vertebrae and on the shoulder blade.
This muscle is a flexor; when it contracts, it pulls the shoulder and
head closer together and arches the neck.
A horse standing or just moving in natural posture does not give you a
good chance to see this muscle at work.
Horses that are “working through their backs” will show this muscle
contracting as the top line of the neck stretches. Two ways to see this muscle working to its
maximum are to watch horses jumping large fences (particularly in the take-off
phase) and in high collection.
The crest line muscles are the extensor companions to the Brachiocephalicus.
If they are tight and do not lengthen well, it will interfere with the
correct working of the Brachiocephalicus. This muscle also works in concert with the
Serratus to elevate the chest.
Techniques
This is a broad muscle that is readily accessible to massage from its
origin to its insertion. You can use any
number of techniques on it. The best
would be those that push into the muscle and then move up the neck from the
shoulder to the poll. Some of these
could be:
1.
deep effleurage up the entire neck, separating muscle
fibers by pushing the muscle against the neck vertebrae
2.
regular compression and compression of the “press and
glide” type
3.
back and forth friction, working up and down the
muscle, going across the fibers as well
as with the fibers
A stiff curry comb or Grooma type tool works
very well on this muscle, especially when separating muscle fibers by pressing
the muscle against the bones of the neck.
You may feel tight spots in this muscle as you work over the lower neck
vertebrae. This is rarely a problem in
the Brachiocephalicus, but rather it is usually in
the cervical attachments of the Serratus.
If a horse reacts to your work on this muscle with acute sensitivity and
pain there is a good possibility that the neck vertebrae are out of alignment
and a chiropractor needs to look at the horse.
Loosening the neck muscles may sometimes correct minor misalignments,
but if the sensitivity persist suggest that the owner
call a chiropractor.
There is important work to be done at the poll attachments of the Brachiocephalicus, but I’ll discus this with the massage
work on the head, jaw and poll.
CERVICAL SERRATUS MUSCLES
1.
Peter Goody – diagram 4 (page 20)
2.
A Coloring Atlas – plate 17
The cervical portion of the Serratus attaches to the lower four neck
vertebrae (C 4, 5, 6 and 7) and is a very important part of the complex of
muscles that lift the forehand and extend and arch the neck. It does its part by contracting and lifting
the curve in the lower neck vertebrae.
With most muscles, correct function is usually inhibited by the muscle
being overly contracted and too tight.
This is not the case with the Serratus.
When the Serratus “fingers” are not working correctly, they lack tone and
do not contract to lift the lower neck vertebrae and the rib cage. If you see hollow areas in the lower neck,
just in front of the shoulders, you will know that this muscle is slack and
lacks tone; it is not engaging and doing its job.
This muscle is also very important for lateral flexion and bending in
the lower neck.
Review section J (Area Behind the Shoulder) for
a more complete description of this muscle and its function.
SPLENIUS
Neither Peter Goody nor A Coloring Atlas shows a good picture of this
muscle in its entirety. “The Anatomy of
the Horse” by Way and Lee has a very good diagram of this muscle.
The Splenius is a broad muscle whose origin is at the withers. It fans out to fill the space on the side of
the neck above the cervical Serratus. It
attaches to the poll at the occipital bone (behind the ears), to the Atlas (1st
vertebrae) and to the 3rd, 4th and 5th
vertebrae. It is important for both
lateral and longitudinal flexion of the upper portion of the neck and the
head. I will discuss its function in
more detail in the section on the head, but the general massage work that you
do for the neck will loosen the bulk of this muscle.
Techniques
There are three types of massage that you’ll do on the sides of the neck
in the space between the vertebrae and the crest line.
1.
You will do general massage for the entire area. This will cover the Splenius in the upper
portion as well as the Serratus in the lower part. You will be affecting many other muscles, but
these two are large, close to the surface and are major support muscles. You’ll use deep effleurage, circular or back
and forth friction, compression, compress and glide and perhaps some muscle
combing. You can do all of these with
your hands or with tools
I usually start at the base of the neck and
work upward toward the head. This
general work will loosen the muscles and prepare them for both longitudinal and
lateral flexion. This approach would
have you working across the fibers of both the Serratus and Splenius.
2.
The second type of massage you’ll do will be to release constrictions and
possible adhesions where the Serratus and Splenius attach to the neck
vertebrae. This will be particularly
important for the Serratus attachments.
You’ll use direct thumb and finger cross-fiber friction and deep, static
thumb and finger pressure along the top edge of the neck vertebrae where these
muscles attach. You may need to use a
lot of pressure against the vertebrae.
3.
The third is a group of techniques you’ll use for lateral flexion in the base
of the neck. These techniques will be
various types of Positional Release and Rocking. Review these techniques from lesson 6. Do the Positional Release first and finish
with the Rocking.
Positional
Release
A horse with tight Serratus muscles usually has the lower part of its
neck braced on both sides. You’ll see
this as “lumps” on the sides of the neck where the Serratus attach to the
vertebrae. The two Positional Release techniques
that I’ll describe will release this tension.
Positional Release and Rocking should be done after the other neck
massage work.
Positional Release #1 – This
form of Positional Release is shown in photos in lesson 6. The horse will need the freedom to bring its
neck around toward its side, so it will need to be untied. As my example, I’ll describe Positional
Release on the left side.
Face the left side of the horse’s neck.
With your left hand on the halter, put your right hand (fingers or fist)
along the top edge of these lower neck vertebrae (C-4, 5 and 6; you can’t reach
7). Push the neck away from you as you
bring the horse’s head around toward you.
You will need to hold the horse’s head in place as you push the neck
away.
Be prepared to have to use a lot of pressure in pushing the neck
away. Use some deep pushing pressure
with thumb or fist and some short stroke friction to get this portion of the
neck to yield.
The aim is to release the tension where the Serratus attach to the
vertebrae. You’ll be pushing the neck
away from you, out to the right, causing the right side to stretch around to
the left. When this stretch occurs, the
head will come around toward the horse’s left shoulder or ribs without you having
to hold it there. This releases the
tightness on both sides. The left side
(because of the massage work) has gained the capacity to contract and the right
side lengthens. Repeat on the other
side. Try to get the horse to hold this
position for 5-10 seconds.
Sometimes the horse will start circling, just go with it and keep the
pressure on. The circling helps the
release.
Positional Release #2 – This
is essentially the opposite of Positional Release #1 in that the horse will
bend its neck away from you. I did not
show photos of this in lesson 6.
For this, again (as my example) you’ll stand on the left side of the
horse, facing the left shoulder. You are
going to reach under the neck with one of your hands; you can use either hand
to do this, whichever is most comfortable for you. If you reach under the neck with your right
hand, your left hand will be on the horse’s halter, but instead of pulling the
head toward you it will be there to encourage the head to go to the right as
the neck begins to bend to the right. If
you use your left hand to reach under, use your right hand to stabilize the
withers and keep the horse from moving.
Now, with the one hand, reach under the neck and “dig in” with you
fingers on the upper edge of C-4, 5 and 6.
Pull toward you; you’ll probably have to use a lot of pressure. The horse should arch its neck around to the
right, bringing its nose around to its shoulder or ribs. Try to get the horse to hold the position for
5-10 seconds. Occasionally, the horse
will stretch the neck down to the right, rather than around. It’s not quite as good a stretch, but it may
be the best the horse can give. Do this
exercise from both sides.
This technique requires a lot of finger strength, but there are a couple
of reasons for doing it. First, because
the horse’s neck is bending away from you, it will be able to stretch around in
a long smooth arc without your body being in the way.
Second, since the neck vertebrae have only muscles and ligaments (no
bones) for support, it is very easy for the vertebrae to be pulled out of
alignment. This misalignment usually
requires a chiropractic adjustment; but occasionally the misalignment may only
be slight and caused by an uneven tension between muscles that hold the
vertebrae in place. This particular
technique will sometimes release that tension and you will feel and hear the
vertebrae settle back into place. It’s not
something you are trying to do—we DO NOT do chiropractic adjustments—but it
does happen sometimes. So, if you hear
this “pop”, don’t worry that you’ve done something wrong. Usually the horse will tell you it was a good
thing by chewing and giving a big sigh.
If the misalignment is in the vertebrae themselves, not caused by muscle
imbalances, this technique will not correct it.
Rocking
Rocking is a technique that can be used effectively to break up tension
and bracing between the different parts of the horse’s body and can be used at
any time during a massage. Because the
neck is “hanging out in space”, rocking can be quite effective at loosening
neck tension. It is particularly
effective at loosening the joint between the last neck vertebra and the first
vertebra of the rib cage. It also makes
a nice finishing touch at the end of a massage.
Below are two different forms of rocking that I use often on the neck.
Rocking #1 – Stand near the head of the horse, facing the neck. Place a hand on either side of the lower neck
where you see the neck braced; usually this will be where the neck joins the
shoulder or over the “lumps” of the 3rd and 4th
vertebrae. Push the neck back and forth
with your hands, setting up a nice smooth rhythm that gets the whole neck
rocking.
Rocking #2 – This form of
rocking moves the base of the neck in relationship to the shoulder portion of
the rib cage. It’s meant to loosen the
junction between the last neck vertebra (C-7) and the first thoracic, or rib,
vertebra (T-1). Restriction at this
joint does not allow independent movement between the neck and rib cage and
inhibits bending and lateral flexion of the neck.
My example is from the left side of the horse, but because this
sometimes works better from one side than the other, do it from both
sides. Stand on the left side of the
horse, facing the shoulder. Hold the underside of the neck, somewhere in the
lower half, with your left hand. Lay
your right forearm diagonally across the left side of the horse’s rib cage, grasping
the withers with your right hand. You
want to set up a rocking motion between the lower neck and the withers by
pushing and pulling between these two points.
If the withers don’t move, use your forearm to move the rib cage. Occasionally, with very stiff horses, I’ve
used elbow pressure in the space between the ribs to get the rocking
started.