Stable Management
Lesson Seven
Leg
Protection, Bandages and Poultices
In
your role as a Stable Manager you may have to apply leg-wound bandages,
exercise bandages or leg protection for shipping.
Everyone
likes to see pretty leg wraps and bandages, and there is no reason why every
bandage or wrap shouldn’t be pretty. But
the key to being a good bandage or leg wrap is protection. If it doesn’t protect, it
doesn’t matter how good it looks.
There
are four types of leg protection - (1) wound bandages (2) standing wraps, (3)
exercise wraps and (4) shipping boots or wraps.
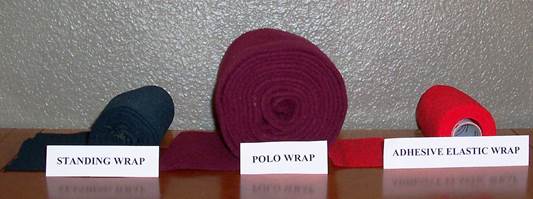
KNOW
YOUR WRAPS
There are basically three types of
outer wraps. There are variations of the
basic wraps which may be “named” differently by individual horsemen. In this
lesson we will use the basic three and the common names.
1. Standing wraps: this wrap is made of light weight material
with some stretch, such as polyester knit.
It is used with quilts or bandages that cover a wound or poultice. Standing bandages can also be used when
shipping a horse. They are usually wider and longer than other wraps. They are never used as an exercise bandage. (Other names – track bandage, turf knit and
stall bandage)
2. Polo wraps: this wrap is soft and bulky. Its function is to protect the horse’s leg
from cuts or bumps by a hind or fore foot while the horse is doing its normal
work routine. It is not designed to
cover a wound as the bulk makes the finished bandage too thick.
3. Adhesive elastic wraps: these handy wraps are easy to tear, are self
adhesive and can be wrapped tightly around the leg. They are used to cover wound bandages and can
be used over a light sheet of cotton as an exercise wrap. (Common name is Vetwrap.)
WOUND BANDAGES
You
can make wound bandages from almost any clean, soft material in an
emergency. For normal day-to-day scrapes
and cuts, you should have several sizes of gauze pads, and gauze wraps in your
first aid box. (You can purchase all
sizes, shapes and lengths at most drug stores.
Keep them in their boxes before and after each use; once contaminated
they can cause trouble rather than prevent it.)
Chances of keeping a wound bandage in place over on any wound
(other than one on the horse’s legs) are slim and none. You can apply a gauze pad to an open wound on
a shoulder or hip or neck or back and try to keep it in place with adhesive
tape, but the results will probably be less than desired. It is usually best to clean such wounds, and
then use a spray disinfectant, topical dressing or what is sometimes called
“liquid bandage.”
For
leg wounds, use the gauze pad or gauze wrapping, then leg quilts or sheet
cotton, topped by a self-adhesive crepe bandage (most common brand name Vetrap) or standing bandage. Use a short piece of adhesive tape or masking
tape to secure the “bandage” tie.
With
wound bandages the purpose is to medicate and protect.
Clean the wound, apply medication to a
sterile gauze pad, or any non-adherent material, and then cover the wound. To hold the pad in place, use sheet cotton or
a thick cotton quilt followed by a standard knit wrap. (Sheet cotton is still used extensively at
race tracks under wound bandages and exercise bandages, but seldom seen today
at show barns or boarding stables. It is
simply difficult to handle. For wounds,
the puffy, soft pillow quilt is gaining popularity.) The thicker the protective wrap, the less
likely the outer knit bandage will be applied too tightly or will exert uneven
pressure on the leg.
Wound
bandages for leg wounds are being applied to the wound, so there is no attempt
being made to protect the coronet band or bulb of the heel. Simply end the bandage at the fetlock joint.
If the coronary band or the bulbs of
the heels have been injured, then the wound dressing, pad and bandage material
is best applied over the entire hoof.
Once the wound bandage is in place, wrap the entire hoof with duct
tape. Duct tape is easy to apply and is
strong enough to allow the horse to walk on the bandage for up to 24 hours
without the bandage falling off.
When putting on a wound bandage, always bandage the opposite leg as
well, giving equal support to both legs.
Never put a full bandage on one leg without putting a full bandage on
the opposite leg. This applies to hind
legs as well as front legs.
APPLYING THE
BANDAGE
Be Careful with Bandages
Bandaging
a horse’s legs effectively and correctly is a skill every horseman should
perfect.
Improperly
applied bandages can slip, bunch, gather and constrict a tendon with the
potential of becoming a “bandage bow.” A
bow to a tendon is any damage that causes inflammation and scarring. Bows cause at the very least temporary
lameness, and even after healing will impair a horse’s ability to perform. Be careful applying bandages; don’t bandage
bow a horse!
The
best leg wraps apply equal pressure along the length of the wrap…they are not
too tight causing reduced circulation, or too loose as to slip from position.
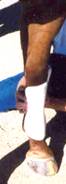
A
basic bandage includes sheet cotton or cotton quilt, the wrap (standing or
adhesive elastic) that holds the sheet cotton or quilt in place and masking
tape as a final safeguard to keep the wrap from unraveling. (Before Velcro, grooms fastened the end of
bandages with safety pins. It was
practical at the time, but not the safest.
Today there is no reason to use a safety pin—so don’t!)
If
you wish to use sheet cotton, it comes in 12-sheet packages; enough to make
four bandages. To make a bandage, open
two sheets and lay the top of one sheet on the center crease of the other
sheet. Now put a third still folded
sheet on top of the other two, and fold the top and bottom flaps over the third
sheet. Roll the bandage so you can then
apply by unrolling around the leg. Now
you know how sheet cotton wraps should be done, I’ll suggest you don’t use
them; instead using commercial quilted wraps.
Sheet cotton is difficult to handle, sometimes bunches and often rips.
In
the past flannel made the best outer wrap because it is almost impossible to
put on too tight—has no stretch. But
today, the knit or polyester bandage is the most popular. Put the knit or polyester bandage on over
thick quilting, and pull firmly and you’ll have a good bandage.
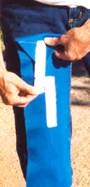
Putting on the Outer Wrap
Start
the outer wrap on the inside of the leg with the rolled bandage in your hand
closest to the horse’s head. Take the
end of the bandage and place it in the center of the inner side of the leg just
above the fetlock joint. (I want you to
start all wraps just above the fetlock joint so that you can wrap the fetlock
joint first and anchor the bandage to that joint. There is little chance you can pull the wrap
too tight around the joint since it is virtually all bone.)
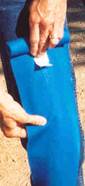
Bring
the roll of bandage from the inside of the leg to the outside, pulling taunt
only across the front of the cannon bone.
Wrap the bandage around behind the tendons and grasp the bandage again
inside the leg with your hand closest to the horse’s head. DO NOT PULL TIGHT ACROSS THE TENDONS. Bring the roll of bandage across the cannon
bone again inside to outside.
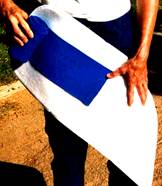
At
this point, if you want to support the fetlock, go down around the fetlock
joint. (You do not
go under the fetlock with a standing bandage.) Start a figure “8” around the
fetlock joint with an upside down “V” on the front of the fetlock joint. The upside down “V” keeps the bandage from
restricting flexion of the joint. Put at
least two figure 8s around the fetlock joint and then begin to wrap up the leg
with each revolution of the bandage. You
should end the bandage just below the knee.
Fasten with the Velcro, and than place a strip
of masking tape over the Velcro fastener.
The direction in which to wrap a
leg is a topic of debate.
Some professionals
think it does not matter, others think it does….we think it matters.
Wrapping so the material is
“pulled across the cannon bone” and “laid across the tendon”
can prevent swelling,
accumulation of fluid, restriction of blood vessels and avoid creating pressure
points.
It doesn’t take any more effort
to wrap in the direction which can avoid problems.
To
be sure the Velcro fastener is always correct, roll the Velcro fastener tongue
on top of the permanent Velcro strip and inside the bandage as you roll the
bandage.
If you are putting on a
bandage other than an exercise bandage, it is not necessary to make a figure 8
around the fetlock; you can simply make the bottom of the bandage even around
the bottom of the fetlock.
STANDING WRAPS
Standing bandages
are just that; bandages applied to give the legs mild support or to cover a
mild leg brace or in use with a “sweat” while the horse is
standing in his stall or pen.
Horses should not be turned out or exercised while wearing standing
bandages.
The most practical standing wrap is the machine washable quilt and the
polyester knit wrap.
WHITE WASHABLE QUILT
There are all kinds of quilts—some made with foam, some pillow, some
plush—but the best are simple cotton as they are easy to use and easy to
wrap. Quilts that are too thick, too
spongy or too slippery are difficult to handle and increase the chance of
mistakes and eventual injury.
If you feel that a single quilt is not thick enough to afford protection
against a bandage bow, use two quilts together for double thickness.
Quilts come in sizes by height: 10 to 12 inches, good for front legs; 12
to 14 inches, good for hind legs.
Anything over 14 inches is generally considered a “shipping quilt.” When purchasing quilts,
buy good quality. Cheap, thin
quilts will gather or bunch and will “wear out” after several washings.
When buying outer wrap knit bandages,
again look for quality. Cheap bandages
don’t last.
Even though most knit bandages come
with Velcro fasteners, always use a wrap or two of masking tape over the Velcro
fastener. (Plastic tape is used only on
exercise wrap.) Masking tape breaks
easily and will not tighten or stretch, as will plastic tape.)
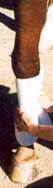
1. Apply the standing bandage
quilts by placing the edge of the quilt in the middle on the inside of the leg
in the groove between the cannon bone and the tendons.
1. START INSIDE THE
If you are doing the left leg, hold the edge of the quilt in the groove
with your right hand, while you pull the rolled quilt forward toward the horse’s
head, and then across the cannon bone.
Be careful to keep the quilt in place as you change hands to wrap the
quilt.
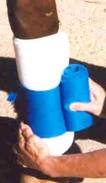
2.
Wrap the quilt around until you reach the end.
2. WRAP UNTIL END IS REACHED
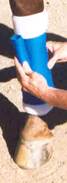
Now apply the knit wrap just as you
have been previously instructed.
3. Start on the inside of the fetlock
joint and wrap from the inside toward the horse’s head, pulling snug across the
cannon bone. You DO NOT
go under the fetlock joint with the standing bandage.
3. START THE WRAP ON THE INSIDE
4.
Make two or three wraps around the fetlock joint to anchor the bandage,
and then begin wrapping up the leg. With
a little practice you should be able to move up the leg so the last couple of
rounds end the bandage just below the knee.
Apply the Velcro fastener and the masking tape for security.
4. WRAP UP THE
5.
An even amount of white quilt should show at the top and bottom of the
bandage so the outer wrap doesn’t touch the leg. Some people like the knit wrap to completely
cover the white quilt top and bottom.
Personally I think the bandage looks best when it is smooth, snug, doing
its job and safe.

5. STANDING BANDAGE
Remember, when putting on standing bandages, always put a bandage on each leg. This gives equal support to each leg. Do not put a full bandage on one leg without
also bandaging the opposite leg. This
applies to front and hind legs.
Spider
bandages are used on knees which flex
farther and more often than either hocks or fetlocks. The spider bandage is basically a standing
bandage on the knee with a special “spider” outer wrap.
You can easily make a spider bandage from a piece of fabric—an old
pillowcase works well. Tear the
pillowcase so that you are working with only one side. Now fold the side of the pillowcase in half
and make a series of marks about two inches below the fold. Working from the side opposite the fold, cut
with scissors, strips about an inch wide all the way up to the marks you made
two inches below the fold. When you get
done you should have about a dozen strips on each side of the four inches of
uncut material in the center.
Bandage the knee with a medicated pad,
or leg paint or whatever medication has been recommended, then wrap with a
light layer of gauze.
Once the knee has been wrapped for
medication, you will apply a normal standing bandage on the lower leg.
With the standing bandage in place,
wrap the knee with a quilt or quilts. To
hold the quilts in place on the knee, use the spider bandage.
Place the solid portion of the bandage
partially on the front of the knee and partially on the inside of the knee,
this should allow the strips of bandage to be tied on the outside edge of the
knee and leg.
Starting at the top, tie the strips in bows, just like
you were tying shoelaces. Take
the tail 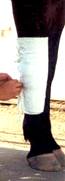 of
the bow and lay it flat against the knee or leg, and then tie the next set of
strips in a bow over the tail of the previous bow. Continue down the leg and continue tying
right over the standing bandage.
of
the bow and lay it flat against the knee or leg, and then tie the next set of
strips in a bow over the tail of the previous bow. Continue down the leg and continue tying
right over the standing bandage.
Do not leave the opposite leg
bare. You must put a standing bandage on
the opposite leg.
For those not inclined to make a
spider, you can use Vetrap in place of the spider
bandage. The Vetrap
is self-adhesive and if you wrap it just a little way down the standing bandage
it will usually hold the wrap in place. Be
careful you do not make the Vetrap bandage too tight.
All standing bandages should be removed at least every 12 hours. Allow the horse to remain unwrapped for a
minimum of ½ to 1 hour before reapplying a standing bandage.
EXERCISE WRAPS and BOOTS
Exercise
Wraps (Brace Bandages or Running Bandages)
Exercise wraps are very tricky and
should not be attempted the first time without an experienced supervisor
watching. Exercise wraps are most often
seen on race horses, sometimes jumpers and sometimes cross country eventers.
Exercise wraps do not give
protection to the leg, nor do they help hold tendons. A well-done exercise wrap simply slows down
the descent of the fetlock joint, helping to avoid serious pulls or tears to
tendons or ripping of joint ligaments.
The exercise wrap is stretchy and is
meant to be on tight. Adhesive elastic
bandage is used frequently (such as Vetwrap).
It is never a good idea to have an exercise bandage on longer than one
hour.
The exercise wrap should be applied
by anchoring to the fetlock joint as previously explained. The exercise wrap should go around the
fetlock joint in a figure 8, dipping lowest at the back of the joint to protect
the sesamoids. (If the horse being
wrapped is known to “rundown” – have the back of the fetlock joint hit the
ground when fully extended—then you can add a plastic cap as additional
protection. Put cotton on first, then
the cap, then the exercise wrap which then holds the cap in place.)
You may use sheet cotton—very thin
layer—under the exercise wrap, or you may use nothing but a “leg brace”-- which
is a liniment.
Only put three or four figure 8 wraps
around the fetlock joint, then being moving up the leg. You must pull the wrap tight around the leg
in order to be effective and in order to keep the material smooth. Work slowly and carefully so there are no
wrinkles in the wrap. Pull on the wrap
and stretch it as you go. The exercise
wrap is of no value if it is not tight.
You should end the exercise wrap
about 2 inches below the knee. Smooth
the end of the wrapping material, and then secure it in place with one or two
strips of electrical tape. DO NOT pull
the tape to tear it; cut it with scissors.
Polo wraps are
considered a type of exercise wrap, but don’t function in the same way and are
not very effective.
Polo wraps are made of polar fleece,
which is very hard to get tight enough to insure safety. In addition to being difficult to get snug,
the material only affords a tiny bit of protection for the leg.
Polo wraps are used most of the time
at the racetrack and often by show horse trainers and riders. Don’t use polo wraps outside of manicured
ground as the wraps gather dirt and hold it against the leg…tiny pebbles and
sand can chafe the skin.
The most frequent mistake made with
polo wraps is that the wrap is not low enough around the fetlock joint to protect
the joint. If you wrap the polo in the
same manner as the exercise bandage, starting at the fetlock joint, you will
usually have the most effective polo possible.
With
the many good exercise boots on the market it should not be necessary to use exercise
wraps. The danger of causing a serious problem due to improper application of
the wrap is great. If using wraps there
is also the possibility of it becoming loose and tripping or frightening the
horse.
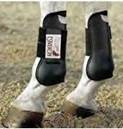
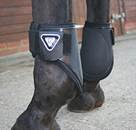 Exercise Boots
Ankle or Fetlock Boots are
designed to protect the sesamoid bones during jumping or galloping. They are usually made of leather or neoprene
and have a padded cup which fits inside the fetlock joint.
Bell or Over-Reach Boots are used
when a horse has a tendency to over-reach with his hind feet and interfere with
the front. These horses tend to pull of
the front shoe. Bell boots are also used
if the shoes have studs. They protect
the opposite foot in case the horse takes a misstep and interferes with
himself. Many stable managers will also
put bell boots on a horse before turning them out for exercise or lunging.
Combination Boots provide more
complete protection, acting as both an ankle boot and a splint boot. These boots also provide support which slows
the decent of the fetlock, helping to prevent hyperextension. A bell boot can be added for more protection.
 Galloping or Cross Country Boots supposedly provide
protection for a horse while doing fast work.
They reach from just below the knee to below the fetlock. They are usually fleece or felt lined.
Galloping or Cross Country Boots supposedly provide
protection for a horse while doing fast work.
They reach from just below the knee to below the fetlock. They are usually fleece or felt lined.
 Open Front Boots are open in the front so the horse
will feel it when brushing a fence; the back is closed to protect the tendons
from an accidental kick from a hind leg when the horse is jumping. The boots attach by means of narrow straps
that criss-cross the front of the leg. If not properly applied, the straps can cause
injury to the leg.
Open Front Boots are open in the front so the horse
will feel it when brushing a fence; the back is closed to protect the tendons
from an accidental kick from a hind leg when the horse is jumping. The boots attach by means of narrow straps
that criss-cross the front of the leg. If not properly applied, the straps can cause
injury to the leg.
 Skid Boots apply protection for
the back of the fetlock joint of the rear legs when a reiner or working cow horse slides. The boots are cupped to fit over the fetlock
joint, but care must taken to insure they are not too
loose or too tight.
Skid Boots apply protection for
the back of the fetlock joint of the rear legs when a reiner or working cow horse slides. The boots are cupped to fit over the fetlock
joint, but care must taken to insure they are not too
loose or too tight.
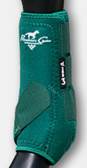
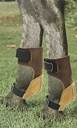
Splint or Brushing Boots are
popular with trainers and riders of young horses since they protect the inside
of the leg where the horse is most likely to strike himself with the opposite
front leg, or an overreaching hind foot.
Usually the boots are molded to
prevent slipping and provide a good fit.
Put the boots on so the padded section is to the inside of the leg and
the shaped cup fits over the inside of the fetlock joint. Fasten on the outside. The boot should fit snugly, but not tightly.
Splint boots seldom prevent splints
which most often occur from stress, not the striking of the leg. The splint boots does nothing to diminish
bone stress.
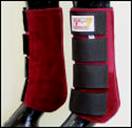
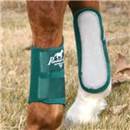
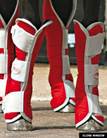
SHIPPING BOOTS
Those
who want to protect a horse’s legs during shipping usually use commercially produced
shipping boots. The use of quilts and
knit bandages for protecting legs during shipping is an option.
Shipping boots
come in all kinds of configurations. They come in all colors and convenient
sizes.
Shipping
boots are generally fleece-lined, well padded and fasten with Velcro strips, so
 they are easy to put on and
take off. The best boots, from the
horse’s point of view, have a flap across the back of the heel which protects
the bulbs of the heel when the boot is in place-- extending below the coronet
band. There are shipping boots for front
legs and shipping boots for hind legs.
they are easy to put on and
take off. The best boots, from the
horse’s point of view, have a flap across the back of the heel which protects
the bulbs of the heel when the boot is in place-- extending below the coronet
band. There are shipping boots for front
legs and shipping boots for hind legs.
Poorly
made or poorly fitted commercial shipping boots can become loose, allowing them
to slip and slide off. It would be
better to use nothing at all, instead of having a shipping boot dangling from a
horse’s leg.
Bell
boots may also be used in shipping to protect the horse from pulling off his
front shoes and to protect the heels or bulbs of the hoof.
Shipping bandages are usually made of a thick quilt about 14
to 16 inches in height. The quilt must
be wide enough that it extends below the coronet band and the bulbs of the
heel. It should reach to just below the
knee. (This is one of those cases where
it isn’t always pretty, but must always protect.)
The
quilt is held in place by a long knit bandage, the same type used for standing
bandages. Again, the key is
protection.
The
bandage must cover the coronary band and the bulbs of the heels or it isn’t
worth the time to put it on. Most trailer
injuries come from the horse stepping on himself as he tries to maintain
balance during a turn or during stops, or from slipping off the side of a
trailer ramp. Most of the injuries are
therefore scrapes and cuts to the coronary band, the bulbs of the heels or the
pastern.
If
you plan on hiring a commercial hauler to transport a horse check their policy
about leg protection. Some companies
prefer the horse’s legs not be wrapped, as the driver will not reapply the
bandages or boots. The driver may remove
the loose leg protection…or not.
If
you decide to protect legs with boots or bandages get the horse used to wearing
them before the day of shipping.
Allowing the horse to wear the chosen leg protection in the stall will
give you time to see how they fit, if they stay on and how the horse reacts to
having something on his legs. Poorly
made or poorly fitted commercial shipping boots can become loose, allowing them
to slip and slide off.
Many
people who transport horses will only protect the front legs. It is possible if the horse urinates in the
trailer the wraps or boots can become soaked in urine. This could lead to scalding of the skin,
kicking or stomping because of irritation.
* As with all
equipment used on horses – if it is poor fitting or causes irritation
discontinue use.
POULTICES and SWEATS
Cold and Hot Therapy
Poultices
A
poultice is a moist substance that can be used hot or cold. They have many uses.
Poultices
can be used to inhibit inflammation and swelling after exercise; they can be
used to draw out infection and used in an area where more circulation is
needed.
COLD POULTICES:
Cold
poultices are used for immediate treatment of an injury – usually within the
first 72 hours (acute period). Research has
shown the sooner cold therapy is started – the better the results. Cold treatment is used when heat needs to
be removed and blood vessels constricted.
Cold aids in the reduction of inflammation.
The
best and least expensive “poultice” is cold water. After stressful exercise or immediately after
an injury, hosing the area with cold water will remove heat, slow inflammation
and the cold will help decrease pain.
Hosing for at least 20 minutes is recommended. The water must be cold - room temperature or
warm water will not work. Water that is
approximately 12-15 degrees Celsius (53 – 59 degrees Fahrenheit) is ideal.
Ice
is very effective for cold therapy. The
best results are achieved by applying ice 15 - 20 minutes every two hours. Leaving ice on the flesh too long can cause
tissue damage. Only apply cold water or
ice to an open wound until the initial swelling subsides.
There
are several methods used to apply ice to a horse’s leg: a frozen bag of
vegetables (I prefer peas because they are malleable) from the kitchen, crushed
ice in a bag or one of the many commercially produced ice boots or wraps that
are on the market.
The
addition of a wrap to hold the ice bag in place can offer the added benefit of
compression therapy. But the risk of
damage to the tissue due to overexposure to the ice is high. Caution is advised.
Ice and Treating Laminitis:
If
laminitis is suspected or heat is detected in a hoof, immediate icing of the
entire hoof can be of great benefit. At
the 2008 American Association of Equine Practitioners convention research was
presented showing that ice decreases the activity of deleterious enzymes and
decreases inflammation. Cold treatment
must be started while early in the acute stage to be effective.
Standing
a laminitic horse in the snow or in a cold stream has
been a long time treatment for laminitis.
If you don’t have access to a snow bank or cold river, stand the horse
in a rubber pan filled with water and ice that reaches to the coronet
band. Wrapping the hooves in a large
plastic bag filled with ice is another option. Commercially produced ice boots
are available and will reduce the labor required to treat the horse.
During
the AAEP convention researchers reported that it was not detrimental (and in
fact is recommended) to continuously apply ice to the hoof for as long as 72
hours. Ice greatly reduces the
inflammatory effects related to acute laminitis. Soaking the hooves for longer than 72 hours
can be detrimental as it softens the hoof wall and leads to new problems.
Commercial Cooling Poultice Products:
There
are also several commercially prepared poultices on the market that can be used
for cooling the equine limb. The main
ingredient in these products is clay.
The clay will be listed as kaolin (white clay) and bentonite (volcanic
ash). Other ingredients such as aloe,
glycerin and fragrance may also be included.
These
products will be the consistency of mud (after all that’s what it is). The mud is applied to the area fairly
thick. It is recommended a moist
paper…like a brown paper bag, be put over the poultice and then a cotton
bandage used to hold it in place. If the
moist paper is not used, heat will be generated once the product starts to dry
– defeating the purpose.
If
brown paper is not available apply the poultice and let it draw the heat as it
dries. Do not put a bandage over it.
Poultices
should be washed off after they are dry.
Another
very good product is Animalintex pads. These pads are cotton wool with a poultice agent
and antiseptic imbedded in the material.
Cold water is added to the pad and it is applied to the area. A latex bandage is used to hold it in place. They are used to treat an injury.
Many
trainers use cold therapy in the form of cold water hosing or cold poultice
products after exercise on a daily basis.
Heat
is used on an injury during the chronic state - after the acute stage has
subsided. It is recommended not to use
heat on an injury until initial swelling starts to decrease. Heat is good for arthritis and old injuries
that are cool to the touch.
Heat
is used to manage chronic pain – after the acute stage. Research has shown that heat applied during
the acute stage (immediately after the injury) can actually increase pain by
stimulating the blood vessels. During
the chronic stage, heat can ease the pain related to the muscle spasms. It is also thought heat eases pain because it
raises the pain threshold of the nerves.
Heat
is also used to help repair damaged muscle, tendons and ligaments. Applying a hot poultice to the affected area
can help relax collagen tissues and permit stretching of the tissue. Heat therapy will aid gentle stretching and
range of motion exercises during rehabilitation. Be sure heat is not used on joints if the
injury is acute.
Moist
heat is also used to draw out infection. Soaking an abscessed hoof in hot water
mixed with Epsom salts can promote drainage.
Horses that have strangles may develop abscesses under the jaw. Applying moist heat can help rupture the
swelling and promote drainage.
There
are several methods of applying moist heat to an area. Wet towels can be heated in the clothes
dryer. Commercial hot packs are
available that can be heated in the microwave.
Apply the heat for about 15-20 minutes.
The
commercially produced clay products can also be used as a hot poultice. Warm the clay by putting some in a waterproof
container and immerse it in hot water.
Once the product is hot, apply it to the area, cover with a gauze and then
wrap.
Animalintex pads make excellent hot poultices.
Extreme
caution must be taken that you or the horse are not burned.
Sweats
Swelling
of the legs can be caused by exercise, injury or poor circulation (also known
as “stocking-up).
Heat
increases blood circulation to the injured area, which assists the healing
process. A “sweat” bandage can soothe
bruising and reduce the build up of fluid in the area.
A sweat bandage is just a standing
bandage, which may cover the knee, the lower leg, and/or the fetlock joint over
a medication or preparation which creates heat.
A simple sweat can be made with a water-soluble wound salve which
contains nitrofurazone (Fura-Zone). Apply the salve over the area to be sweated;
the tendons, for example. Now wrap the
leg with plastic wrap. Use enough
plastic wrap above and below the subject area to cover most of the leg. Now apply the standing bandage. Remember to put a standing bandage on both
legs, even if only one leg needs treatment.
Nitrofurazone is a known carcinogenic (may cause
cancer). Many people also have severe
reactions to the salve if they get it on their skin. It is highly recommended disposable gloves be
worn. Read the cautionary statements on the salve container.
Sweat
bandages should be removed after 12 hours, unless the veterinarian has advised
differently. Most stable managers have a
rotating schedule of 12 hours on and 12 hours off. If the horse still needs standing bandages,
they are applied without the medication and plastic wrap.
If
the horse shows signs of irritation discontinue the use of the medication.
DON’T LET YOUR HORSE
CHEW HIS WRAP
If
you are wrapping a horse for the first time, do not leave him unattended until
you are positive he is not going to begin biting at or tearing his bandages.
If
you have no experience with the horse and must leave him overnight without
supervision, apply a leather or plastic muzzle.
What may not be a big problem when you leave can be a big problem when
you return if the horse has injured himself tearing at his wraps.
With
horses that simply attempt to play with their wraps, there are several
remedies. Cayenne pepper mixed with a little
water to make a paste then dabbed extensive over the wrap generally stops
Dobbin after his first taste. (I have
known of a couple of horses who actually seemed to like the bandages with a
little spice. For those horses, laundry
soap mixed into a paste seemed a better remedy.)
There
are commercial products that claim to keep horses from chewing wraps. Test and retest, and be sure the product is
working before leaving a confirmed bandage chewer alone.
Regular
cleaning and care of boots and wraps will protect your horse from scrapes and
rubs caused by damaged material or dirt.
In addition, regular cleaning gives you a chance to catch potential
breakage before it happens.
Any
kind of fleece wraps must be clean prior to being applied and immediately after
use. Dirt, burrs, mud, tiny sticks, who
knows what get stuck in fleece instantly---put these things next to the horse’s
skin and you are asking for trouble.
Cotton
or polyester outer wraps should be washed the instant they are contaminated by
dirt, mud or greasy medications. Close
the Velcro fastener, then put the wrap in a net bag
designed for panty hose, toss into the washing machine and dryer and when you
take them out nice and clean they will also be “tangle” free.
Leather
boots should be cared for in the same way you care for all leather
equipment. Whatever method you prefer is
fine as long as you get it cleaned and conditioned. As you clean, check for cracks or stitching
which is wearing or gone. Missing
stitching and loose straps should be repaired before the next use.
Brush
out the lining so that it is clean when put away. Be sure to store all leather equipment in a
dry place to avoid mildew.
TIPS FOR EMERGENCIES
If
you have a major bleeding wound, don’t worry about how ugly the wrap may
be. Grab clean material such as towels,
or even paper towels and use whatever is handy to hold the padded material in
place with pressure. Once you get
pressure on the wound you can start to look for nice bandage material.
If
you have a major wound, do not medicate.
Clean quickly with clear cool or warm water, and then apply the pressure
bandage material. You do not want to put
any substance in a major wound that may have to be removed prior to
stitching. Just get a temporary bandage
on the wound.
When
using padding, the more the better.
If
you don’t have any commercial self-adhering bandage material, use an elastic
bandage and hold it in place temporarily with plastic or masking tape.
Don’t
trust self-adhering bandages; apply a bit of masking tape over the end.
If
you don’t have padded material handy for an emergency bandage, a disposable
diaper or clean heavy sweat socks will work for a pressure bandage.
If
you don’t have gauze and you need a light first bandage, cut the foot off a
nylon stocking, and wrap with the nylon.
Assignment:
1. Make a video of you putting a standing
bandage on a horse.
Please load
the video to a video hosting site such as YouTube
or Photobucket.
2. Do some
research and tell me how to make a homemade hot poultice.
Send the link
to the video and your report to elblazer@horsecoursesonline.com Please make sure your full name and email
address are on all documents.