Equine Massage
LESSON SEVEN
I. Safety
II. Body
Mechanics
III. Massaging
the Horse
I. SAFETY
Safety for you, the horse, other people and animals in the vicinity has
to be your first priority. You do not
want to be responsible for injury to the horse you’ll be massaging or to
others. It is your responsibility to be
award of your surroundings.
SAFETY FOR THE
HORSE
First you have to decide how to restrain the horse. You need to know if it ties RELIABLY. If so, does it do so just on a single rope or
in cross-ties as well? If the horse does
not tie reliably it will need to be held by someone.
Next, you need to decide where to tie the horse. You do not want to tie to a tree or a free
standing pole. The horse is going to move
during the massage and you don’t want it circling a tree or pole, winding
itself up short. The best place is the
corner of a stall where it can only move 90 degrees. The outside of a stall or a fence line where
it can move 180 degrees will also work.
Cross-ties work well as long as the aisle is not too wide and the
cross-ties are not attached too high on the walls. If either of these is the
case, the horse could turn around in the cross-ties and this can be
dangerous. Wherever you tie the horse,
try to position it in such a way that it can see what’s going on.
Try to keep distractions to a minimum.
A distracted horse can be difficult.
Dogs and young children are particularly distracting. But one of the biggest distractions will be
flies and other insects. I ask owners to
spray the horse.
If you object to working on a horse that has been
sprayed with insect repellent, you might bring some of your own that you’re
comfortable with. But if you do,
be sure to get the owner’s permission to use it—some horses are very sensitive
to different kinds of sprays.
Because it is important for the horse to be aware of the changes
occurring in its body during the massage, I don’t let the horse eat hay or
other foods while I’m working on it; this can be a major distraction. However, on some few occasions, I have worked
on horses that were so hyper-sensitive about their bodies they seemed ready to
climb out of their skins. In these
cases, I agreed to allow them hay to divert their attention away from their
bodies in their first massage session.
The horse is going to move around during the massage, this is part of
the process. Move buckets, tack
trunks, stools, etc. out of any areas where the horse might move. Keep dogs, cats and other animals away. If the horse is standing in the barn aisle,
make sure that other horses can’t reach out and annoy it.
My preference when working on a horse is to use a regular leather or
nylon halter rather than a rope halter.
I like the stability they offer, especially when I’m working on the neck
and head.
Because horses will move around during their massage, they will
occasionally step on one front foot with the other. Over the years, I have had two horses pull a
shoe during a massage. If a horse has
front shoes or long, built-up feet and you’re concerned about this, you might
ask the owner to put bell boots on them.
Even with an apparently good natured horse, someone who knows the horse
well should be there during the first sessions.
In addition to the safety factor, they can often give odd pieces of
information that will have a bearing on the horse’s problems. Later, when you and the horse are comfortable
together, you can work without someone in attendance, but there should always
be someone close by.
DO NOT WORK ALONE WITH STRANGE HORSES.
Any tools or equipment you use should be clean and disinfected. In addition to the tools that I use on the
horse, I also carry with me a leather muzzle, bell boots, longe
line, longe whip and insect repellent (for people and
horses). All of this is equipment that
you might have a need for and can’t be sure it will be available.
Be aware of the surface the horse will be standing on. Try to avoid slick surfaces where the horse
might slip—rubber mats, dirt or shaving are the safest.
SAFETY FOR
OTHER PEOPLE
1. Ask that other animals (horses, dogs,
cats, etc.) be kept away. If they make
the horse nervous, it could kick or react in some way.
2. Be sure that other people are not where
they could get stepped on or kicked as the horse moves around. Also, other people standing close to you and
the horse could interfere with your ability to move freely and cause you to get
stepped on or hurt.
3. Horses are sensitive to the emotions of
the people around them. Some owners will
fuss, touch and worry over their horses as you’re doing the massage. Explain that it’s difficult for a horse to
divide its attention between two people touching it at the same time. Ask the owner to sit somewhere away from the
horse unless you need their help.
II. BODY MECHANICS
Though the intent of
massage is to relieve soreness and tightness in the muscle
structure, in order for it to be effective at doing so on a permanent basis
(not just temporary relief) the pressure will often be uncomfortable before it
feels better, especially when you’re applying pressure to areas that are
already sore. Horses will use a wide
range of body language to tell the person doing the massage how it is feeling
about the area they’re working in, the touch and the pressure.
The first signs of discomfort may be as subtle as the twitch of an ear
or a turn of the head. The horse might
pick up a foot and threaten to kick. The
more sensitive you are to these little signs, the less the horse will feel the
need to over-react in order to call attention to its discomfort. Being aware of
the little signs allows you to adjust to the horse’s tolerance level before it
starts to over-react.
Though the greater majority of
horses that you work with will give you very little difficulty, remember that
many of these horses are hurting and can be defensive. Some of them will try to kick and bite.
With all of the above in mind, how you use your body when doing massage
becomes very important for your safety.
Also, your body mechanics can be the cause of stresses and strains that
affect your health and soundness; this is particularly true of your hands.
In human massage schools, students are taught how to keep their bodies
sound and functioning properly as they massage other people. In massaging horses, this is just as
important, and there are some aspects of your body mechanics that I want to
bring to your attention. They are:
1. Using your hands
2.
Using your body weight
3.
Placement of your feet
Care of your hands is very important; it is one of the reasons why I use
some grooming tools in my work. They give
me greater leverage and depth when I need it without putting undue strain on my
hands. Using the heel of your hand, your
fist or elbow whenever possible will also help preserve your fingers,
particularly your thumbs.
A regular routine of stretching your hands can help relieve strain; but
even better would be regular maintenance massage for yourself, with extra
emphasis on your hands.
During a massage I usually have two hands on the horse at all
times. Even if only one hand is doing
work, the other will be giving me information about reactions in the horse’s
body. It gives me a contact point to
feel the horse’s movement, where it’s going and what it’s going to do. If you have this contact point and the horse
moves toward you, it will push you with it instead of running over the top of
you. The contact between the two of you
is like ballroom dancing—you move together because you’re connected.
If I’m using both hands to do the body work, I will often lean my head
or shoulder against the horse’s body to get that same information and contact
point. This is especially true when
working on the chest and upper legs.
Using your body weight to support your hands and arms is another way to
increase your effectiveness and relieve the hands and arms of much strain. Put you body weight behind your pressure,
leaning either from your feet of hip joints.
Your force should go up through your legs, hip joints and torso and,
finally, through your arms and hands.
Your body weight should support your arms. If you’re muscular and somewhat tall, it’s
easy to fall into the habit of just using your arms, pushing just from your
shoulders. But it’s better for your body
if you stand with your feet away from the horse and lean your weight behind your
arms. It’s also safer for your feet.
When you’re doing massage on a horse, you’re usually going to be much
closer contact with it than under normal circumstances like grooming and
tacking-up; it’s easier to get stepped on.
Horses step where they lean their weight. When a horse leans its body in a direction,
it will then move a foot in that direction to catch its balance—the feet go
where they need to be in order to support the body. So, even though your hands on the horse’s
body will usually give you warning that the horse is going to move, it’s also a
good idea to keep your eyes on their feet.
Their body will tell you they’re going to move, but it won’t necessarily
tell you where they’re going to put their feet.
If you use your peripheral vision you can see all four feet at the same
time and still see where you’re working.
Keep your feet separated, with one foot behind the other as much as
possible. Keep most of your weight on
the foot farthest from the horse. This
allows you to move your other foot quickly and easily if the horse steps toward
you. If you’re standing in front of a
horse, stand with your feet wide apart in case the horse steps forward. Wear sturdy shoes, but I don’t recommend
steel-toed shoes.
A horse that is hurting or sore may try to kick when touched. Most horses will just threaten and, through
your hands, you can usually feel it coming.
I will feel it just as the leg start to move and I’ve found that a light
slap on the horse’s back with the flat of my hand (one
that makes a noise) will usually defuse the kick.
If a horse is inclined to kick, it will usually do so when you’re
working on the belly, groin or stifle.
If the horse is really touchy about these areas, you may decide to leave
them for another session, after the horse is more comfortable with what you’re
doing. If a horse indicates it does not
want me to work in that area in the first session, they will usually let me do
so in the second session, but, with a few horses, I have had to wait for the
third session.
When working around the stifle and groin, I will often have my forearm
or hand resting in front of the stifle or just above it. If I feel the horse start to lift the leg I
can put downward pressure on the stifle and stop the kick.
Horses that really intend to kick don’t usually give a lot of warning;
they don’t threaten. The kick seems to
come out of nowhere. But these horses
usually do tell you to watch out way in advance. With these horses, you’ll know almost
immediately, when you first meet them, that they are going to be
difficult—their body language will give you fair warning.
Horses that try to bite are another problem you may encounter. This will usually happen when you’re working on
horses with sore shoulders and necks.
Normally, I’ll just deflect the attempt by reaching up and gently
touching their face, or push their face away.
If they get a little more aggressive, I’ll put my elbow up and let them
run into it or have the owner hold the head.
But if the horse is very persistent it can get to be a distraction to
the body work. I worked on young
thoroughbred race horses for four years and used a leather muzzle on many of
them. In that way they could bring their
heads around and “talk to me” and I didn’t have to worry or react. I still carry one in my box and do have a
need for it occasionally.
Horses that strike can be dangerous, but they’re rare, and are usually
stallions. In the four years of working
on the young race horses only two ever tried to strike, and they were both
incredibly sore in their shoulders. Be
very careful when working on horses that want to strike; or you may choose not
to work on them.
On a few rare occasions, I have agreed to work on horses that have been
sedated. It’s not an ideal situation,
but the horses needed help and it made it safe for me (these were usually race
horses). Horses that might strike could
fall in this category.
There are other safety factors that will come up when massaging the
different areas of a horse’s body, but I’ll discuss them when describing the
work on those areas.
SUMMARY OF YOUR
BODY USE
1. Support your arms and hands with your
body weight.
2. Keep two hands on the horse—one gives
information while the other works.
3. Be aware of where your feet are and how
you can move them quickly.
4. Know how to deal with horses that kick
5. Know how to deal with horses that bite
6. Know how to deal with horses that
strike
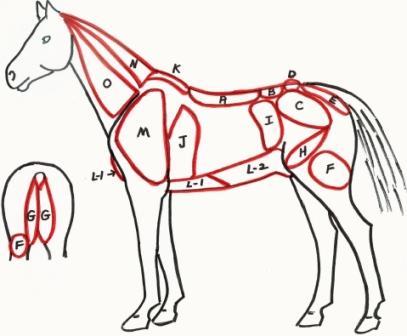
III. MASSAGING THE HORSE
This section will take you through a full body massage. There are several diagrams that go with this
lesson. They show the horse’s body
divided into various areas. These areas
are labeled and there is an accompanying description that describes the following:
1.
the important muscles in these various areas
2.
what these muscles do
3.
massage techniques that are the most effective for the
area
4.
other pertinent information applicable to the area
I focus on areas of the body rather than on specific individual muscles
because your massage will rarely affect just one muscle. Muscles occur in layers and overlap one
another. Some muscles are very thin, so
it is easy to be affecting deeper muscles as well as the more superficial ones.
With each area I will refer you to pages and diagrams in two anatomy
books that were on the recommended list for this course. In this way you will be able to see the
various layers of muscles, how they overlay one another and interact. This is also a way to get a good review of
the skeletal and muscular anatomy from lesson two.
I will give you reference pages in Peter Goody’s “Horse Anatomy” and
“Horse Anatomy—A Coloring Atlas”. If you
have other anatomy books, use them as well.
All anatomy books will have slightly different ways of showing the same
muscles and structures.
Cross-referencing among them will give a more complete picture.
I will be describing a progression from one area to another for a full
body massage that starts with the horse’s back, goes into the hindquarters,
works forward through the belly line into the shoulders and neck and finally
finishes with work on the poll, head and jaw.
This is a good progression if you’re doing a full body massage for
relaxation or maintenance. If you’re
massaging a horse that has specific problems, you will not necessarily follow
that progression. After having taken a
history of the horse and made an evaluation of its structure and movement, you
will have a sense of where the most obvious problem is. After loosening up the back, you will proceed
to that area.
I know that many people start their massage with the head and work back
toward the hindquarters. My
understanding of their reason for doing so is that there are powerful endorphin
points in the head that induce the horse to relax quickly and helps make them
more accepting of the rest of the massage. Because structural massage and body
balancing are addressing soreness and balance on a much deeper level than other
types of massage, including sports massage, it often involves using pressure
that can initially be uncomfortable enough to disrupt any relaxation gained by
starting with the endorphin points in the head.
PRESSURE IN
YOUR MASSAGE
How much pressure do you use?
All massage requires pressure; how much pressure depends upon the type
of massage. You always have to get a
response from the muscle.
In relaxation massage, the response you want will only affect
superficial muscle tension. Your
pressure would be smooth and gliding; it should not cause discomfort and a horse’s
responses will be to relax, sigh, soften the eyes and chew.
Other kinds of massage will need more pressure in order to be
successful. These other types of massage
will be working on muscles at a deeper level and dealing with muscles that may
be tight and sore from injuries, chronic stress and over-use. In order to relieve this soreness and
tightness, the pressure will need to be enough reach the deeper muscles,
separate the bound-up muscle fibers and reset the tension in the neurological
component of the muscles.
How do you know if you’re using enough pressure, too much pressure or
too little?
Effective pressure (the right amount) has to make a change in a
muscle. The change we’re looking for is
that the muscle yields to the pressure you’re using. When the horse yields, it will do so by
moving away from that pressure. With
extremely tight muscles, you will have to use a lot of pressure. If the horse is very sore, it will only take
a small amount of pressure to cause the horse to yield and move. In both cases, if the horse yields to the
pressure, it was effective pressure whether you had to use a lot or only very
little. At first the horse will make big
movements. As soreness and tightness
diminish, the “away” movement will simply be the muscles softening and yielding
to your touch.
If a horse is very sore, and you continue to push even as the horse is
flinching and moving away, you’ve held the pressure too long. The most effective pressure for very sore
horses is “press and release”. As soon
as the horse gives a response, you release the pressure. You keep repeating this press/release
sequence, moving over the sore area until the horse’s responses become quiet
releases and yields to your finger tips.
Muscle density plays a large part in how much pressure you need to use
in your massage. Horses with heavy,
dense muscles will require a lot more pressure than lighter muscled horses such
as Arabs or Thoroughbreds. In a heavy
muscled, tight horse, if you get no response to your pressure, then the
pressure is not enough and is, therefore, ineffective.
In human massage, effective pressure is often described as being “a good
hurt”. Horse’s bodies seem to also
understand this concept. Experiment with
pressure; don’t be afraid of hurting the horse—it will tell you if you’ve gone
too far; and all you have to do is release the pressure and the discomfort is
gone. But you’ll never know how far to
go if you don’t experiment.
THE MASSAGE
I start my massage with the long back muscles. The back is the connection between the
forehand and hindquarters and it is going to be affected by tension and
imbalances from both areas. I will
loosen the back first, relieving any soreness and tension there before going to
the area where I saw the major problem.
With the deep structural work, relieving the soreness in the body of the
horse (especially the back) is just as effective at achieving mental relaxation
as doing the endorphin points in the head first. Also, many of a horse’s problems actually
originate in the back because of rider imbalances and bad saddle fit.
A. LONG BACK MUSCLES
1.
Peter Goody – Horse Anatomy – diagram 3 (pg. 17), diagram 4 (pg. 21),
diagram 5 (pg. 25)
2.
Horse Anatomy – A Coloring Atlas, plates 16 and 17
The major muscles of this area of the back are the Spinalis
dorsi, Longissimus dorsi, Iliocostalis dorsi and the thin fascia portion of the Latissimus dorsi. Palpate all three of the muscles to determine
if all are sore or just one or two.
Usually the sorest will be the one closest to the spine, the Spinalis dorsi.
Techniques
If these back muscles are TIGHT, but not sore, you will use techniques
that separate the muscles fibers in order that they can stretch more easily.
Tight muscles can be “cemented” together either by lymph fluid that has
pooled in a muscles or from scar tissue.
Appropriate techniques for these muscles if they are very tight (but not
sore) would be friction and muscle combing.
The most effective direction would be across the fibers. Circular friction also works well here.
As the muscles begin to loosen or if they were just moderately tight,
you can use a technique I call “press and glide”—a technique I use
frequently. I will use compression to
push down into a muscle and then, either with the heel of my hand, finger tips
or some type of “tool”, push through the muscle. You can use this technique going across the
muscle fibers, with the fibers or you can use a circular movement. You will work your way down the muscles by
pressing and then gliding a few inches, then repeat, working your way down the
muscles.
Tools that you could use would depend on the degree of tightness and
could be the stiff, serrated rubber curry comb, the plastic “bristle” type of
curry comb, some type of Grooma grooming tool or a
mane comb.
If these muscles are SORE, you will find that the best initial technique
will be one that uses a simple press-release approach. You would do simple compression using just
your finger tips, working up and down the back muscles. Go slowly and constantly explore how much
pressure you can use. Gradually, as the
soreness decreases, you can use some effleurage using either the heel of your
hand or finger tips. It would be very
unusual to use any tools on sore back muscles.
If you feel any obvious knots or hard spots in the muscles (chunks in
your peanut butter) do trigger point massage in those places.
One of my favorite approaches when working on sore backs is to stand on
one side of the horse, reach over the backbone and use my finger tips to first
push down into the muscle closest to the vertebrae, then pull towards the
backbone (toward me). I work my way down
the muscle, moving an inch at a time (this does not work well with long finger
nails).
If, as you start your massage with the long back muscles, they do not
seem particularly tight or sore, use either slow effleurage or friction in a
circular motion and work your way down the muscles from withers to croup
bone. You will do this as a general
loosening before going on to the problem areas.
B. LOINS
1.
Peter Goody – diagram 3 (page 17) and diagram 4 (page 21)
2.
A Coloring Atlas – plates 16, 17, 6
The lumbar area (loins) extends from the last thoracic vertebra to the
croup bone. This is the low back in the
human body. Remember that the last
thoracic vertebra is way up underneath the saddle and the last rib arcs back
from there; there is a lot more loin muscle than you may think.
The superficial muscles of this area are the same ones that I described
in section A – the long back muscles, but I have divided the area into two
sections because the feel in the muscles will be different here. In the loins there are no bones supporting
the spine, only muscles, so the muscles have to be stronger.
There is a heavy, dense muscle under the long back muscles that is the
major support for the lumbar vertebrae.
This is the Quadratus lumborum. It is very deep and is not shown on most
equine anatomy charts. To get an idea of
its structure and placement, look it up in your human anatomy book.
Because of the strength and density of the Quadratus
lumborum, it gives a different feel to the muscles in
the loins. Expect them to feel heavier,
tighter and more dense. Also, in this area, you can feel the outer
edge of the Iliocostalis. It will feel like a tight rope running
between the last rib and the point of the hip.
Techniques
If this area is not sore, but just TIGHT, brisk, cross-fiber friction is
a good technique to use. Also,
cross-fiber compression works well. This
technique is done more slowly that friction.
In this you would press down into the muscle, push across it, then
release. Repeat this, moving over the
loins. It is usually helpful to use some
kind of tool like the stiff rubber curry when working on the loins unless the
area is very sore.
If the area is SORE, use as much compression as the horse can handle,
moving slowly over the whole area.
“Press and glide” should work well, but if the muscles are very sore,
just use finger tip compression (without the glide).
Because of the density of the area, you may not feel the muscles of the
loins soften as much as muscles in other areas, but, as they begin to release
tension, the horse will start to shift its stance in response to your
pressure. As this happens, you will see
the hind feet begin to move to a more squared position. This will tell you that you have obtained
good releases. Also, the horse will
begin to lower its head, chew and its eyes will soften.
C. TOP OF HAUNCHES (gluteus muscles)
1. Peter Goody – diagram 4 (page 20), diagram 17
(page 55)
2. A Coloring Atlas – plates 16, 17, 33
There are three gluteus muscles in each side of the haunches, but only
two are where they can be massaged.
These are the middle gluteus and the superficial gluteus. For the purpose of massage, I will treat them
as one entity.
Some of the look of these muscles is going to be breed related (think
Quarter Horse and Thoroughbred), but a lot of their development and condition
is going to be the result of how a horse uses its body.
These two muscles have something of a “tear drop” shape and fill the
greater portion of the space on the top of the haunch, going from the edge of
the pelvic bone to the hip joint. These
muscles are, by nature, power muscles.
They control the movement of the pelvic bone. Their job is to support the pelvic bone,
allowing it to drop down when they lengthen and bring it back to its normal
position by contracting. Proper
lengthening and contracting of these muscles affects how well the hind legs
swing back and forth, so if these muscles are tight, they will restrict the
mobility of the hip joint.
Techniques
If these muscles are TIGHT, a combination of cross-fiber friction,
compression and muscle combing are effective.
The use of a stiff curry comb or mane comb works well on these muscles
and protects your hands.
These muscles can become extremely sore in a horse doing work that
requires a great deal of forward/backward thrust, such as racing and
jumping. They are subject to pain from
both stress points (at the origin) and trigger points (in the belly). Review the photos in lesson 6—they show both.
When these muscles are SORE, use the static pressure for stress points
and trigger points, but you can also use finger tip compression in a press/release
mode over the bulk of the muscles as well as connective tissue massage over the
gluteal fascia (Peter Goody – diagram 3, and A
Coloring Atlas – plate 16). As the
soreness begins to subside, you can start some effleurage in gliding motions.
A word of caution when working on sore gluteus muscles – the horse is
very likely to kick. They will usually
kick out behind, but can just as easily kick forward. Be careful.
When working on these muscles, it is more effective if you can work from
a position somewhat above and push down into the muscles; this is particularly
true if the muscles are tight rather than sore.
Unless you are quite tall, you may find that standing on some type of
stool or box will give you that height.
Tension and muscle tone in the gluteus muscles can be a significant
factor in the position of the pelvic bone.
The angle of a horse’s pelvis can vary greatly from a very flat position
(common in some Arabians) to a much steeper angle (seen in some Quarter Horses
and driving horses). If the glutes are short and tight, they will contribute to holding
the pelvis in a horizontal, flat position that inhibits the dropping of the
pelvis as the legs swing forward. Then, all of the leg movement and thrust has
to come from the hip joint; this puts a lot of stress on that joint.
A very steep angle to the pelvic bone indicates that the glutes are being held in an extended position by their
agonist muscles in the groin area. This
strong pull on the glutes will inhibit mobility of
the hip joint. You will see the problem
as an over-extension of the gluteal muscles, but the
real problem is elsewhere. You will do
massage that separates the muscles fibers of the glutes
and prepare them for better contraction, but the solution will involve
releasing tension in the muscles of the groin.
D. CROUP BONE AREA
1. Peter Goody – diagram 17 (page
55) and diagram 22 (page 55)
What we call the “croup bone” is actually the point where the two sides
of the pelvic bone come together in the back.
(This is called the tuber sacral.)
The lumbar/sacral joint of the horse is under this junction of the
pelvic bone. (Review the important
aspects of this joint from lesson two.)
In the human pelvis, the sacrum is held in place by the two sides of the
pelvic bone, rather than being under it.
My thought about the difference in the placement of the lumbar/sacral
joint of the horse would be that the horse needs a much greater range of motion
in this joint and this placement allows that.
When there is tightness or soreness in the gluteus muscles, the
attachments around the “croup bone” will also be affected and there will be
interference with the working of the lumbar/sacral joint beneath it.
As part of loosening the haunch muscles, you will also want to work
specifically all around the croup bone.
Techniques
Use direct finger pressure that pushes down into the muscles all around
this bony area. You could also use
friction. The amount of pressure you use
will depend on whether the area is tight or sore.
If the horse has a steep croup angle, the haunches may flatten a little
as the muscles release—this is good.
If the horse has a steep croup angle and, in addition, the croup bone is
very prominent (goose rumped), and the muscles around
it do not seem to release well to your massage work, it is possible that there
is a problem with the lumbar/sacral joint in which the sacrum has been pushed
upward against the last lumbar vertebra.
This could very possibly indicate a chiropractic problem.
E. UPPER HAMSTRING ATTACHMENTS
1.
Peter Goody – diagram 3 (page 17), diagram 17 (page 55), diagram 22 (page 65)
2.
A Coloring Atlas – plates 16, 17, 33
The term “hamstrings” refers to three
muscles that run down the back of the leg from the sacrum to the lower portion
of the haunch. They are the Biceps femoris, Semitendinosus and the Semimembranosus. These hamstrings and the quadriceps (quads)
are the prime movers of the horse’s hind legs.
The quads pull the leg forward and the hamstrings pull the leg backward.
As was shown in lesson 2 (Anatomy), the horse’s hamstrings go all the
way up to the sacrum for their upper attachments rather than ending at the ischial tuberosity (seat bone) as
ours do. The Biceps femoris
and the Semitendinosus attach to the sacrum in the
area between the croup bone and the tail.
The upper attachment of the Semibembranosus is
under the tail. Be careful working this
attachment.
As the leg is brought forward by the quads and the Tensor fascia latae, the hamstrings are lengthened by the pull of those
muscles and this stretching of the hamstrings starts from all the way up along
the sides of the sacrum. Their contraction
pulls the hind leg out behind the horse.
These upper hamstring attachments are extremely important. If they are tight, either in a short,
contracted state or in a long, extended state, they limit the forward swing of
the hind legs. The massage work in this
area goes in concert with sections C and D (top of the haunches and the croup
bone).
If the horse’s croup is flat, tightness in these upper attachments is
part of the problem and will usually be associated with short, tight gluteals. The
loosening that you’ll get with your massage will let these attachments stretch
and will be an important part of allowing the pelvis to drop into a more normal
position.
If the croup has a steep angle, these muscles will be over-stretched,
tight in the extended state rather than contracted. They will need to be worked on as part of the
over-all release of the hindquarters.
Techniques
If these hamstring attachments to the sacrum are TIGHT, but not sore, do
spot compression using thumb and finger pressure in a direct push into the
muscle attachments along the edge of the sacrum from the croup bone to the
tail. Cross-fiber friction (with fingers
or rubber curry) along the edge of the sacrum is another good technique. If the attachments are very tight, try some
muscle combing along the edge.
If the horse is SORE in the gluteus muscles, then the hamstring
attachments along the edge of the sacrum are very likely to also be sore. If this is the case, your work along the edge
of the sacrum will need to be lighter.
Try some light muscle combing with your finger tips, also do some thumb
and finger compression; just don’t work as deep as you would on tight
attachments. When working on the Semimembranosus attachment under the tail, stand well to
the side of the horse as you reach under the tail. I usually reach under to the attachment on
the other side since horses will usually react where they feel the pressure. That way, if they’re going to kick, it will
usually be with the leg on the other side from where I’m standing.
F. LOWER HAMSTRING ATTACHMENTS
1.
Peter Goody – diagram 3 (page 17), diagram 22 (page 65)
2.
A Coloring Atlas – plates 16, 17, 33, 34
Tightness in the lower attachments, just as in the upper ones, will
prevent a good forward/back stride in the hind legs, and tightness throughout
the entire length of these muscles will produce more of an up/down movement and
shorter strides.
In some horses these muscles are naturally heavily developed and this is
not necessarily a problem if the up/down motion is what a rider wants (Western
pleasure), but you still want mobility in the hip joint so that the jog is
fluid and smooth rather than tight and stilted. Tightness in these muscles is a major
problem if the horse’s work requires a big forward/back swing (galloping
horses, jumpers).
The largest and most accessible of the lower hamstring attachments are
those of the Biceps femoris. They will look like three lumps on the side
of the lower part of the haunch, just behind the stifle joint.
In addition to restricting forward movement of the hind legs, tight
contracted lower attachments of the Biceps femoris
can also rotate the stifle outward, causing the hind leg to swing forward in a
sideways position. This is a serious
problem because it can interfere with the correct movement patterns of all
three gaits—walk, trot and canter.
The lower attachment of the Semitendinosus
will be visible at the center back of the haunch, just above the hock.
The Semimembranosus lower attachment will be
just to the inside of the Semitendinosus, more to the
inside of the leg.
Techniques
I rarely find these lower hamstring attachments sore, usually they are
TIGHT. Effective massage techniques for
the lower attachments of the Semitendinosus and Semimembranosus would be friction across the fibers, muscle
combing and compression. I particularly
like to use a small rubber curry on these areas.
The lower attachments of the Biceps femoris
are more fleshy than those of the other two. In addition to the above techniques, you
could also use kneading. Thought the
name of this muscles, Biceps femoris, implies two
attachments, there are actually three, make sure that you work on all of
them. Work across the three heads then
work up the sections of the muscle toward the hip joint. For this, you can use “compress and glide”.
It also benefits the Semitendinosus and Semimembranosus if you used some deep effleurage up and
down the length of these muscles. They
are normally under a lot of tension and this is a good way to separate muscle
fibers and relieve some of that tension.
G. ADDUCTORS (the insides of the hind
legs)
1.
Peter Goody – diagram 22, Gracilis (page 65)
2.
A Coloring Atlas – plate 34 (this is a very good picture that shows many of the
deeper adductors
Remember the description of agonist and antagonist muscles and how they
work together to move bones away from their normal position and then back to
that original position? The muscles I’ve
been describing up to this point have all had to do with moving the body parts
in a forward/back motion (longitudinal extension and flexion). They are called extensors and flexors. But there are other agonist/antagonist muscle
pairs that move bones sideways. They are
called abductors (move limbs away from the center line of the body) and
adductors (move limbs back toward the center line).
The horse’s adductors are a group of strong muscles on the insides of
the hind legs that hold the hind legs close to the body. They work with the abductors on the outside of
the leg to move the leg sideways. The
abductors move it away from the body, and then the adductors move it back
toward the body and under it. They are
very important for lateral movements.
The massage that you do on the muscles on the outside of the haunches
will facilitate the abduction action of those muscles, but the adductors will
have to be addressed on their own.
The Gracilis muscles is the most superficial
(closest to the skin) of the adductors and the one you will feel under your
fingers, but it is a thin muscle and your massage will also be affecting the
muscles under it.
Sometimes these adductors will be so tight that you will have difficulty
even getting your hand in between the hind legs; the use of your hands will be
restricted and tools are not appropriate.
Techniques
These muscles are usually TIGHT, rarely sore. I have found kneading to be the best
technique for loosening them. It’s quite
effective and will not irritate the sensitive skin of this area. As you knead, you can also lean your shoulder
against the haunch and do some rocking.
H. QUADRICEPS (Quads)
1. Peter Goody – diagram 4 (page 20),
diagram 7 (page 31)
2. A Coloring Atlas –
plates 17, 34
After a contraction of the hamstrings pulls the horse’s hind leg back,
it is the quadriceps (along with the Tensor fascia latae)
that brings the leg forward by pulling the stifle forward.
The quadriceps muscle group is composed of three vastus
muscles and the Rectus femoris, but only two of these
are accessible to us to massage. One is
on the outside of the haunch between the stifle and the hip joint (the lateral vastus). The other
is the medial vastus.
It is on the inside of the leg, going from the stifle up the inside of
the leg.
The area around the stifle, especially
on the inside, is a sensitive area. Even
if the horse is not particularly sore, it can be sensitive or even defensive in
this area. Keep this in mind as you
work. As much as possible,
stand next to the haunch, not out in front of the stifle. This is where I keep one hand or forearm on
the horse’s body, just above the stifle, so that I can feel any upward movement
of the leg and press down to defuse the kick and keep the leg down.
Techniques
Lateral Vastus: Around the stifle, use finger tips in a
kneading motion and some finger tip compression around the top of the
stifle. Then, using either
the heel of your hand or some type of stiff curry comb, work from the
stifle upward to the area around the hip joint.
I primarily use a heavy back-and-forth motion (friction) going with the
direction of the muscle fibers. You
could also use compression and deep effleurage, depending upon how tight the
muscle is. With any of these techniques,
if you can use enough pressure to feel the femur under the muscle, you can
separate the muscle fibers by pressing the muscle against the bone. Also, do friction pressure all around the hip
joint.
Medial Vastus:
This is not an easy area to work on.
Most horses are sensitive about pressure on the inside of the leg as
well as being worried about any pressure in the groin. If they are sore in this
area, they can become pretty defensive.
The skin in this area, like that between the hind legs, is soft and
sensitive. Tools are not
appropriate. I use mostly finger tip
compression that pushes up into the muscle mass. Once the horse accepts pressure in this area,
you can support the outside of the femur with your shoulder or torso and use
enough pressure to push this muscle against the bone for better muscle
separation. You can also do compression
using the back of your fist or do kneading with your finger tips. Again, try to stand next to the haunch, not
out in front, and reach around to the inside of the leg.
If the stifle rotates outward, balancing the tension between the lateral
and medial Vastus will be crucial in bringing the
stifle back to its correct anatomical position.
After working on both of these muscles, you can test the balance between
the two by rocking the joint between your hands. Rotating this joint back to its correct
position will also involve having loosened and prepared all of the other
muscles in the haunch to facilitate this rotation. Work on the muscles in the groin area will
also be involved.